Registrations
We now manually approve all new user accounts due to a large influx of spam bots. Accounts are normally approved within 48 hours.
If you need any help with using this Wiki, please ask here: TalkFord.com Wiki Submission Forum
Difference between revisions of "How to remove a dash surround and cluster."
Stevieb12345 (Talk | contribs) |
|||
| (5 intermediate revisions by one other user not shown) | |||
| Line 1: | Line 1: | ||
| + | {{note|'''The Ford Mondeo hit our roads in 1993, and has consistently been a sales success. Now on its 4th incarnation, it remains a drivers favourite.'''<br> | ||
| + | '''For more information, visit the [http://www.talkford.com/forum/596-mondeo/ Ford Mondeo] forum on [http://www.talkford.com TalkFord.com], the definitive resource site covering all Fords from the present day to the 1970's.'''}} | ||
| + | ---- | ||
| + | {{Infobox | ||
| + | |name = Infobox Template | ||
| + | |bodystyle = float:right; valign:top; | ||
| + | |image = [[File:Fordwiki infobox.png]] | ||
| + | |imagestyle = | ||
| + | |caption = Overview Guide | ||
| + | |captionstyle = | ||
| + | |headerstyle = background:#ccf; | ||
| + | |labelstyle = background:#ddf; | ||
| + | |datastyle = text-align:right; | ||
| + | |header1 = | ||
| + | |label1 = Ford Model: | ||
| + | |data1 = '''Mondeo''' | ||
| + | |header2 = | ||
| + | |label2 = Petrol/Diesel: | ||
| + | |data2 = '''???''' | ||
| + | |header3 = | ||
| + | |label3 = Estimated Cost: | ||
| + | |data3 = '''???''' | ||
| + | |header4 = | ||
| + | |label4 = Difficulty? | ||
| + | |data4 = '''???''' | ||
| + | |label5 = How long does this take? | ||
| + | |data5 = '''???''' | ||
| + | }} | ||
'''Removing a MK2 dash surround and cluster.''' | '''Removing a MK2 dash surround and cluster.''' | ||
| Line 21: | Line 49: | ||
4. Now using the same knife and rag remove the heated window switch. | 4. Now using the same knife and rag remove the heated window switch. | ||
| − | 5. With the clock and heated window buttons out of the way,We now need to remove 5 screws! (See picture for the position of the screws) Remove the two screws in the clock area and then the screw where the heated window switch was. The next two | + | 5. With the clock and heated window buttons out of the way,We now need to remove 5 screws! (See picture for the position of the screws) Remove the two screws in the clock area and then the screw where the heated window switch was. The next two screws are a little harder to get at and you might need a longer screwdriver. (See third picture for position and fourth picture on how to remove.) |
[[Image:DSC00043_800x600.jpg ]] | [[Image:DSC00043_800x600.jpg ]] | ||
| Line 45: | Line 73: | ||
--[[User:Stevieb12345|Stevieb12345]] 13:27, 27 August 2009 (UTC) | --[[User:Stevieb12345|Stevieb12345]] 13:27, 27 August 2009 (UTC) | ||
| − | [[Category: | + | [[Category:Mondeo_Mk2]] |
| | ||
Latest revision as of 21:09, 20 February 2011
For more information, visit the Ford Mondeo forum on TalkFord.com, the definitive resource site covering all Fords from the present day to the 1970's.
|
Overview Guide | |
| Ford Model: | Mondeo |
|---|---|
| Petrol/Diesel: | ??? |
| Estimated Cost: | ??? |
| Difficulty? | ??? |
| How long does this take? | ??? |
Removing a MK2 dash surround and cluster.
Things you need.
1. Phillips screwdriver.
2. Large flat butter knife. (Do not use a sharp knife!)
3. A old rag.
1. Pull the steering wheel as far down and out as possible. This gives you more room to work.
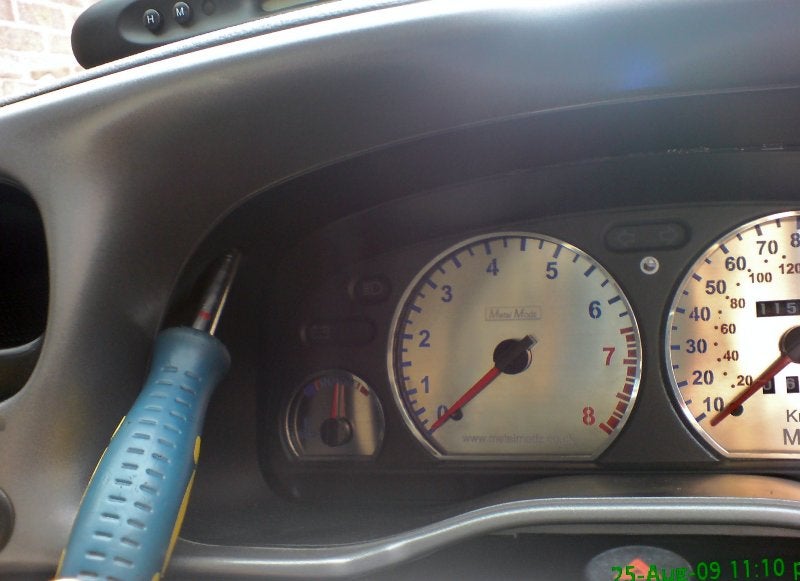
2. Wrap the rag around the end of the knife and slide it between the clock and dash surround. (see first picture.) Now carefully prize the clock out.
3. Undo the electrical connector on the back on the clock.
4. Now using the same knife and rag remove the heated window switch.
5. With the clock and heated window buttons out of the way,We now need to remove 5 screws! (See picture for the position of the screws) Remove the two screws in the clock area and then the screw where the heated window switch was. The next two screws are a little harder to get at and you might need a longer screwdriver. (See third picture for position and fourth picture on how to remove.)
6. With all the screws removed you can now remove the dash surround,It should just pull out.

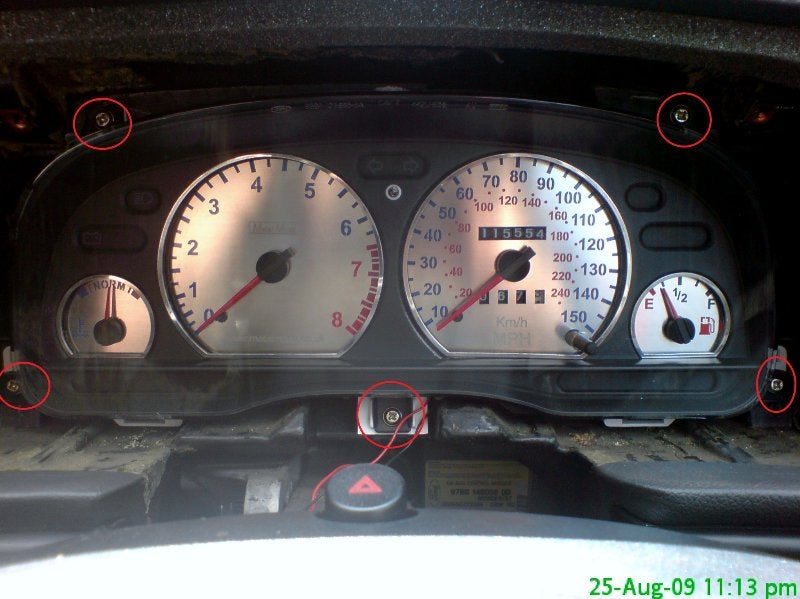
7. Now the the dash surround has been removed we can get to the cluster. There are 5 gold colour screw that now need removing. (See picture)
8. Once all five screws have been removed you can pull the cluster forward a little bit. This is to allow you space to get your hand in behind to undo two wiring connectors.
9. The cluster should now just lift out.
--Stevieb12345 13:27, 27 August 2009 (UTC)


 Your Privacy Choices