Registrations
We now manually approve all new user accounts due to a large influx of spam bots. Accounts are normally approved within 48 hours.
If you need any help with using this Wiki, please ask here: TalkFord.com Wiki Submission Forum
Difference between revisions of "Auto/Light Sensing Headlights"
Compuwiz uk (Talk | contribs) (→Method) |
|||
| (3 intermediate revisions by 2 users not shown) | |||
| Line 1: | Line 1: | ||
{{note|'''The Ford Mondeo hit our roads in 1993, and has consistently been a sales success. Now on its 4th incarnation, it remains a drivers favourite.'''<br> | {{note|'''The Ford Mondeo hit our roads in 1993, and has consistently been a sales success. Now on its 4th incarnation, it remains a drivers favourite.'''<br> | ||
'''For more information, visit the [http://www.talkford.com/forum/596-mondeo/ Ford Mondeo] forum on [http://www.talkford.com TalkFord.com], the definitive resource site covering all Fords from the present day to the 1970's.'''}} | '''For more information, visit the [http://www.talkford.com/forum/596-mondeo/ Ford Mondeo] forum on [http://www.talkford.com TalkFord.com], the definitive resource site covering all Fords from the present day to the 1970's.'''}} | ||
| + | ---- | ||
| + | {{Infobox | ||
| + | |name = Infobox Template | ||
| + | |bodystyle = float:right; valign:top; | ||
| + | |image = [[File:Fordwiki infobox.png]] | ||
| + | |imagestyle = | ||
| + | |caption = Overview Guide | ||
| + | |captionstyle = | ||
| + | |headerstyle = background:#ccf; | ||
| + | |labelstyle = background:#ddf; | ||
| + | |datastyle = text-align:right; | ||
| + | |header1 = | ||
| + | |label1 = Ford Model: | ||
| + | |data1 = '''Mondeo''' | ||
| + | |header2 = | ||
| + | |label2 = Petrol/Diesel: | ||
| + | |data2 = '''????''' | ||
| + | |header3 = | ||
| + | |label3 = Estimated Cost: | ||
| + | |data3 = '''????''' | ||
| + | |header4 = | ||
| + | |label4 = Difficulty? | ||
| + | |data4 = '''????''' | ||
| + | |label5 = How long does this take? | ||
| + | |data5 = '''????''' | ||
| + | }} | ||
| Line 25: | Line 51: | ||
Wire. | Wire. | ||
| − | [http://www. | + | [http://www.fordwiki.co.uk/index.php?title=Daytime_Running_Lights & the items from this guide too as this is an add-on to that system ] |
==== Method ==== | ==== Method ==== | ||
| Line 34: | Line 60: | ||
| − | Build the kit as the [http://www.velleman. | + | Build the kit as the [http://www.velleman.eu/downloads/0/minikits/manuals/manual_mk125.pdf manual] describes with just 2 minor changes :- |
1. Instead of fitting the provided connection pins solder 2 wires direct to the circuit board ( 1 for the ground & will need a ring connection on it & the other needs looping round the the block connector to pickup the power from the running light relay - see later piccy ) | 1. Instead of fitting the provided connection pins solder 2 wires direct to the circuit board ( 1 for the ground & will need a ring connection on it & the other needs looping round the the block connector to pickup the power from the running light relay - see later piccy ) | ||
| Line 51: | Line 77: | ||
after final tweaking of the sensor circuit to get the desired activation level on a night you should ( hopefully ) not have to touch the headlight switch again. | after final tweaking of the sensor circuit to get the desired activation level on a night you should ( hopefully ) not have to touch the headlight switch again. | ||
| − | |||
| − | |||
=== Method 2 === | === Method 2 === | ||
| Line 69: | Line 93: | ||
Wire. | Wire. | ||
| − | [http://www. | + | [http://www.fordwiki.co.uk/index.php?title=Daytime_Running_Lights & the items from this guide too as this is an add-on to that system ] |
==== Method ==== | ==== Method ==== | ||
| Line 78: | Line 102: | ||
| − | Build the kit as the [http://www.velleman. | + | Build the kit as the [http://www.velleman.eu/downloads/0/minikits/manuals/manual_mk125.pdf manual] describes with just 2 minor changes :- |
1. Instead of fitting the provided connection pins solder 2 wires direct to the circuit board ( 1 for the ground & will need a ring connection on it & the other needs looping round the the block connector to pickup the power from the Headlight Switch Wire - see later piccy ) | 1. Instead of fitting the provided connection pins solder 2 wires direct to the circuit board ( 1 for the ground & will need a ring connection on it & the other needs looping round the the block connector to pickup the power from the Headlight Switch Wire - see later piccy ) | ||
| Line 95: | Line 119: | ||
after final tweaking of the sensor circuit to get the desired activation level on a night you should ( hopefully ) not have to touch the headlight switch again. | after final tweaking of the sensor circuit to get the desired activation level on a night you should ( hopefully ) not have to touch the headlight switch again. | ||
| − | |||
| − | |||
| − | |||
| − | |||
| − | |||
[[Category:Mondeo_Mk3]] | [[Category:Mondeo_Mk3]] | ||
Latest revision as of 13:49, 17 January 2014
For more information, visit the Ford Mondeo forum on TalkFord.com, the definitive resource site covering all Fords from the present day to the 1970's.
|
Overview Guide | |
| Ford Model: | Mondeo |
|---|---|
| Petrol/Diesel: | ???? |
| Estimated Cost: | ???? |
| Difficulty? | ???? |
| How long does this take? | ???? |
Contents
Mondeo Mk3 Auto Headlights On A Budget
Background
If like me you fancy having auto headlights but dont want the huge expense of retrofitting the ford unit ( requires new windscreen & rear view mirror as well as the auto light/auto wiper system & wiring ) then the following may be worth a try as it should come in at under £10 for everything & require only the lower drivers dash panel, glovebox & windscreen vent grill on the dash removing to fit it.
The way that you fit it will be decided by how you want the lights to operate & the list of parts will be near enough the same for both methods ( probably a relay & some connection crimps extra for one method compared with the other.
Method 1
Daytime Running Sidelights & Auto Dipped Beam Headlights ( the method i went with )
Parts Required
Light Sensor Kit ( Maplins £6 ).
Soldering Iron & Solder.
Wire.
& the items from this guide too as this is an add-on to that system
Method
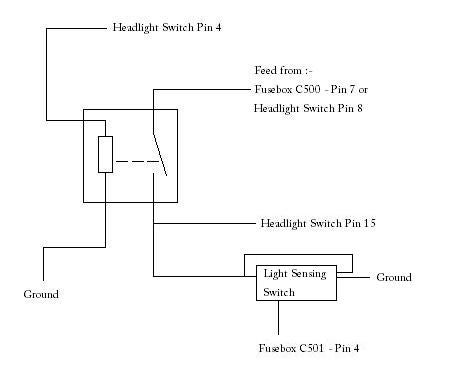
this is a quick diagram of the new Daytime running Light Circuit
Build the kit as the manual describes with just 2 minor changes :-
1. Instead of fitting the provided connection pins solder 2 wires direct to the circuit board ( 1 for the ground & will need a ring connection on it & the other needs looping round the the block connector to pickup the power from the running light relay - see later piccy )
2. fit the light sensor diode to a length of wire & not directly to the circuit board. ( i used about 30cm per wire & i had plenty to spare with the unit sat behind the glovebox )
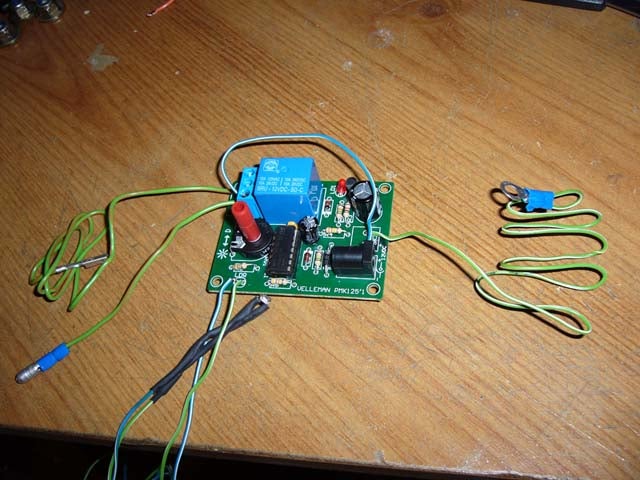
you should end up with something like this thats ready for fitting to the car
the daytime running light relay powers both the circuit board & provides the feed that needs switching by the relay on the circuit, then when the switch activates at the desired level ( adjustable via the dial on the circuit board ) the relay completes the circuit to the fusebox & brings on the headlights.
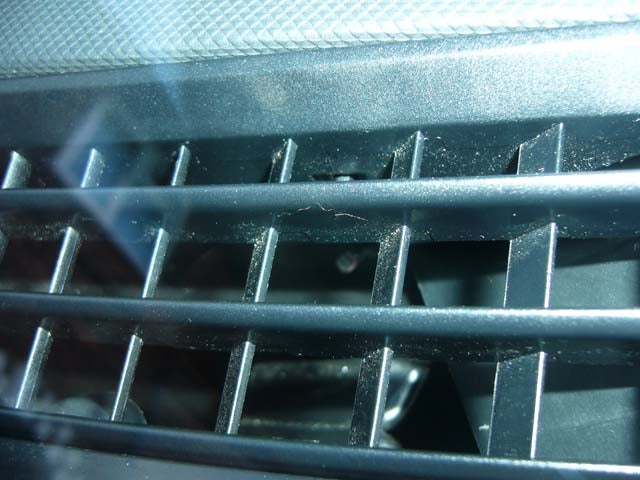
the tiny light sensor can be placed wherever you want it to be placed to get the best function, i chose to fit it under the dashboard airvent grill in a similar position to the ford sunload sensor & so far it seems to have worked a treat ( its a begger to get a piccy of but you get the idea from the following piccy )
after final tweaking of the sensor circuit to get the desired activation level on a night you should ( hopefully ) not have to touch the headlight switch again.
Method 2
Auto Sidelights & Dipped Beam Headlights ( both systems lighting up together )
Parts Required
Light Sensor Kit ( Maplins £6 ).
Soldering Iron & Solder.
Addition Relay
Wire.
& the items from this guide too as this is an add-on to that system
Method
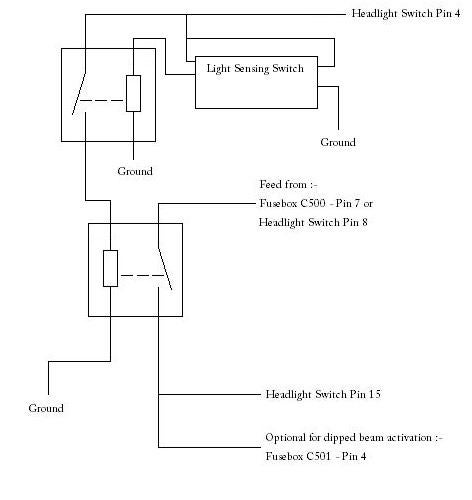
this is a quick diagram of the new Daytime running Light Circuit
Build the kit as the manual describes with just 2 minor changes :-
1. Instead of fitting the provided connection pins solder 2 wires direct to the circuit board ( 1 for the ground & will need a ring connection on it & the other needs looping round the the block connector to pickup the power from the Headlight Switch Wire - see later piccy )
2. fit the light sensor diode to a length of wire & not directly to the circuit board. ( i used about 30cm per wire & i had plenty to spare with the unit sat behind the glovebox )
you should end up with something like this thats ready for fitting to the car ( just ignore the connectors on the wires to the left of the piccy, they will differ on this setup )
the Headlight Switch powers both the circuit board & provides the feed that needs switching by the relay on the circuit, then when the switch activates at the desired level ( adjustable via the dial on the circuit board ) the switch then activates the addition relay & completes the circuit to the daytime running light relay & brings on the headlights.
the tiny light sensor can be placed wherever you want it to be placed to get the best function, i chose to fit it under the dashboard airvent grill in a similar position to the ford sunload sensor & so far it seems to have worked a treat ( its a begger to get a piccy of but you get the idea from the following piccy )
after final tweaking of the sensor circuit to get the desired activation level on a night you should ( hopefully ) not have to touch the headlight switch again.


 Your Privacy Choices