Registrations
We now manually approve all new user accounts due to a large influx of spam bots. Accounts are normally approved within 48 hours.
If you need any help with using this Wiki, please ask here: TalkFord.com Wiki Submission Forum
Difference between revisions of "Cruise Control Retro Fit - Petrol Models"
Compuwiz uk (Talk | contribs) (→Approx Fitting Time & 1st Things To Check For) |
Compuwiz uk (Talk | contribs) (→Pedal Switches & Wiring Loom) |
||
| (18 intermediate revisions by 5 users not shown) | |||
| Line 1: | Line 1: | ||
| + | {{note|'''The Ford Mondeo hit our roads in 1993, and has consistently been a sales success. Now on its 4th incarnation, it remains a drivers favourite.'''<br> | ||
| + | '''For more information, visit the [http://www.talkford.com/forum/596-mondeo/ Ford Mondeo] forum on [http://www.talkford.com TalkFord.com], the definitive resource site covering all Fords from the present day to the 1970's.'''}} | ||
| + | ---- | ||
| + | {{Infobox | ||
| + | |name = Infobox Template | ||
| + | |bodystyle = float:right; valign:top; | ||
| + | |image = [[File:Fordwiki infobox.png]] | ||
| + | |imagestyle = | ||
| + | |caption = Overview Guide | ||
| + | |captionstyle = | ||
| + | |headerstyle = background:#ccf; | ||
| + | |labelstyle = background:#ddf; | ||
| + | |datastyle = text-align:right; | ||
| + | |header1 = | ||
| + | |label1 = Ford Model: | ||
| + | |data1 = '''Mondeo''' | ||
| + | |header2 = | ||
| + | |label2 = Petrol/Diesel: | ||
| + | |data2 = '''????''' | ||
| + | |header3 = | ||
| + | |label3 = Estimated Cost: | ||
| + | |data3 = '''????''' | ||
| + | |header4 = | ||
| + | |label4 = Difficulty? | ||
| + | |data4 = '''????''' | ||
| + | |label5 = How long does this take? | ||
| + | |data5 = '''????''' | ||
| + | }} | ||
| + | |||
== Approx Fitting Time & 1st Things To Check For == | == Approx Fitting Time & 1st Things To Check For == | ||
| Line 4: | Line 33: | ||
basically, check the pedal switch's are the type with a mini loom to them like shown in the piccies below of the bits you require, if they are then source the rest of the bits, if not then you may need to look at the mod more closely to see if its do-able. | basically, check the pedal switch's are the type with a mini loom to them like shown in the piccies below of the bits you require, if they are then source the rest of the bits, if not then you may need to look at the mod more closely to see if its do-able. | ||
| + | |||
| + | Also check the clockspring/fusebox plugs listed in this how-to for the required wires to see if you have them already or not & adjust the parts list as required ( ghia/ghia x's should be pre-wired but other models will be pot luck ) | ||
== Parts Required == | == Parts Required == | ||
| − | + | Pedal switches & wiring loom for a cruise enabled Mondeo ( this can be made from your old pedal switches loom & a few choice parts from a dash loom & a set of switches/plugs from a none mini-loom type Mondeo - this is what i did as i was too tight to pay the price from fords ). ( cruise wired mini-loom - 1137967 - about £15 / additional-cruise brake switch - 7029406 / clutch switch for cruise - 1018344 - both switch's around the £5-£6 mark / existing brake switch is the same on cruise & non-cruise Mondeos ) | |
| + | suitable cruise module ( 1.8-2.0/2.5/3.0 are different module/cables combos ). | ||
| − | + | Fixing bracket for cruise module ( bracket - 6921559 / nuts - 3x 6921559 / bolt - 4380670, the lot should come in at around the £10 mark in total ) | |
| − | + | 3 dash wires from the fusebox to the clockspring ( as can be seen in the piccies above too ) minimum, a further wire is required to get the symbol on the dash if your cluster is programmed to use the symbol that is ( i found the loom i got for the heated seat mod a while back helped with this stage immensely ). The pins on the end of the ford wires look like this: | |
| + | [[Image:Ford pin.jpg|300px]] | ||
| + | But the pins to each of the connectors (2 in the fusebox and one in the clockspring) are different so an old loom from a scrapyard is really needed. | ||
| − | + | Depending on your airbag then you will either need just the cruise buttons & a stanley knife with careful use or you will need a new airbag with cruise buttons if you dont fancy the cutting route ( i went with a new airbag as it came cheap ). | |
| − | + | ||
| − | + | ||
| − | + | ||
| − | + | ||
| − | + | ||
| − | + | ||
| − | + | ||
| − | need a new airbag with cruise buttons if you dont fancy the cutting route ( i went with a new airbag as it came cheap ). | + | |
Piccies of the kit. | Piccies of the kit. | ||
| − | [[Image:some_kit.jpg | + | [[Image:some_kit.jpg|600px]] |
| − | + | ||
| − | + | ||
| + | [[Image:old_loom.jpg|600px]] | ||
== Fitting Instructions == | == Fitting Instructions == | ||
| − | === Pedal | + | === Pedal Switches & Wiring Loom === |
| − | The pedal | + | The pedal switches simply twist to undo from the car. |
| − | Then you need to reach up above the pedal assembly & unplug the switch loom form the rest of the wiring loom | + | Then you need to reach up above the pedal assembly & unplug the switch loom form the rest of the wiring loom |
| − | + | [[Image:Cruise_Pedal_Switches_C35.jpg]] | |
| − | Now refit the cruise loom & | + | ( if you dont have this plug then the fitting of cruise could be more involved which is why its best to check for this plug 1st ) |
| + | |||
| + | Now refit the cruise loom & switches as shown in the piccy below. | ||
| Line 53: | Line 80: | ||
2x suitable connection plugs ( either from a suitable dash loom plug or another pedal loom connector plug ). | 2x suitable connection plugs ( either from a suitable dash loom plug or another pedal loom connector plug ). | ||
4x butt crimps ( or other suitable connection technique ). | 4x butt crimps ( or other suitable connection technique ). | ||
| − | Pedal | + | Pedal Switches & length of wiring loom from a mota with cruise ( mine came from a mota with no connector plug ). |
| Line 98: | Line 125: | ||
you will end up with something like this | you will end up with something like this | ||
| − | [[Image:New_loom.JPG]] | + | [[Image:New_loom.JPG|600px]] |
| Line 104: | Line 131: | ||
| − | [[Image:Pedal_switchs.JPG]] | + | [[Image:Pedal_switchs.JPG|600px]] |
| − | + | ||
| − | + | ||
=== Dash Wiring === | === Dash Wiring === | ||
| Line 138: | Line 163: | ||
[[Image:Glovebox_relays.jpg]] | [[Image:Glovebox_relays.jpg]] | ||
| + | |||
| + | [[Image:Fusebox_rear.jpg]] | ||
[[Image:to_clockspring.jpg]] | [[Image:to_clockspring.jpg]] | ||
| Line 178: | Line 205: | ||
disconnect the wiring from the holding plug in the wing ( and also remove the holding plug from the car ). | disconnect the wiring from the holding plug in the wing ( and also remove the holding plug from the car ). | ||
| − | + | [[image:Cruise module.jpg|500px]] | |
| + | |||
| + | Put the bracket inplace followed by the module ( it may be a squeeze before it goes in properly - also dont forget to plug it in too before finally putting it inplace as the main wiring loom may get in the way once the module is inplace ). | ||
| + | |||
| + | ( piccy so you can see why all that removal & the wiring that gets in the way etc ) | ||
| + | |||
| + | [[image:Control_module_inplace.jpg]] | ||
| + | |||
jack up the front passenger wheel & remove it. | jack up the front passenger wheel & remove it. | ||
| Line 186: | Line 220: | ||
now bend the liner out of the way to access the 3 bolts of the bracket. | now bend the liner out of the way to access the 3 bolts of the bracket. | ||
| − | fasten on the | + | fasten on the 3 x M6 nuts on the fixing bracket bolts. |
re-assemble the mota. | re-assemble the mota. | ||
| − | route the cruise cable from the cruise module to the throttle body & connect it up. | + | route the cruise cable from the cruise module to the throttle body & connect it up to the empty peg on the throttle body. |
| + | [[image:Cruise_cable_inplace.jpg]] | ||
== Testing == | == Testing == | ||
| Line 215: | Line 250: | ||
now press the OFF button & the cruise should switch off. | now press the OFF button & the cruise should switch off. | ||
| − | + | [[Category:Mondeo_Mk3]] | |
| − | + | ||
| − | [[Category: | + | |
| − | + | ||
| − | + | ||
| − | + | ||
Latest revision as of 10:33, 20 October 2012
For more information, visit the Ford Mondeo forum on TalkFord.com, the definitive resource site covering all Fords from the present day to the 1970's.
|
Overview Guide | |
| Ford Model: | Mondeo |
|---|---|
| Petrol/Diesel: | ???? |
| Estimated Cost: | ???? |
| Difficulty? | ???? |
| How long does this take? | ???? |
Contents
Approx Fitting Time & 1st Things To Check For
if you have all the right bits from the offset then its probably about 3-4 hours if nowt goes wrong ( i had the airbag light come on on my mota for some reason - no idea why as i just checked all the wiring & it started working again then )
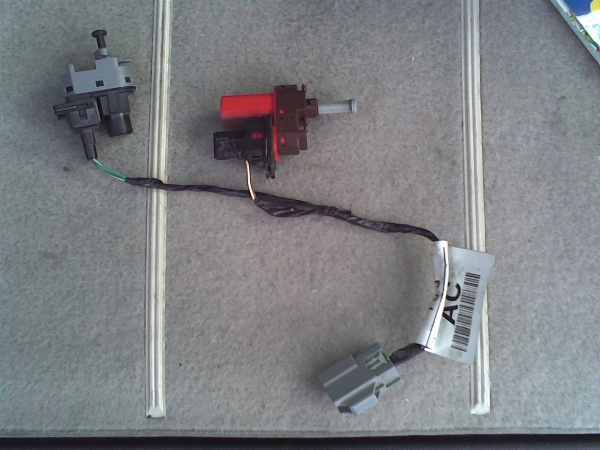
basically, check the pedal switch's are the type with a mini loom to them like shown in the piccies below of the bits you require, if they are then source the rest of the bits, if not then you may need to look at the mod more closely to see if its do-able.
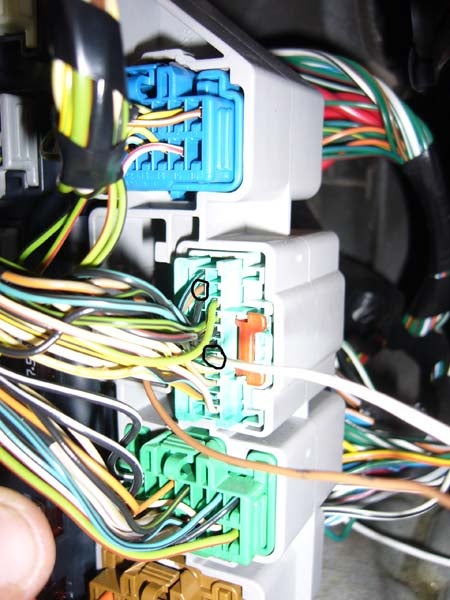
Also check the clockspring/fusebox plugs listed in this how-to for the required wires to see if you have them already or not & adjust the parts list as required ( ghia/ghia x's should be pre-wired but other models will be pot luck )
Parts Required
Pedal switches & wiring loom for a cruise enabled Mondeo ( this can be made from your old pedal switches loom & a few choice parts from a dash loom & a set of switches/plugs from a none mini-loom type Mondeo - this is what i did as i was too tight to pay the price from fords ). ( cruise wired mini-loom - 1137967 - about £15 / additional-cruise brake switch - 7029406 / clutch switch for cruise - 1018344 - both switch's around the £5-£6 mark / existing brake switch is the same on cruise & non-cruise Mondeos ) suitable cruise module ( 1.8-2.0/2.5/3.0 are different module/cables combos ).
Fixing bracket for cruise module ( bracket - 6921559 / nuts - 3x 6921559 / bolt - 4380670, the lot should come in at around the £10 mark in total )
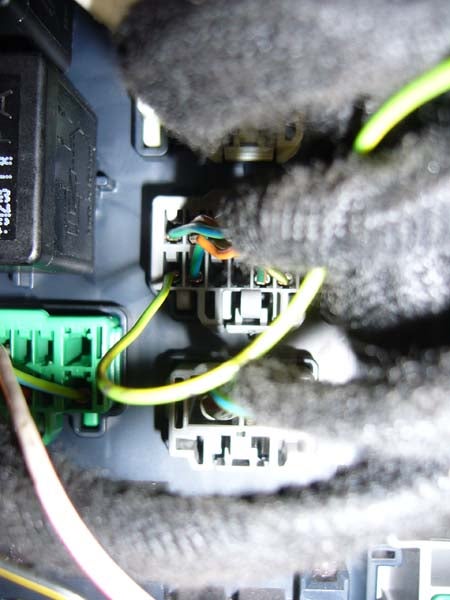
3 dash wires from the fusebox to the clockspring ( as can be seen in the piccies above too ) minimum, a further wire is required to get the symbol on the dash if your cluster is programmed to use the symbol that is ( i found the loom i got for the heated seat mod a while back helped with this stage immensely ). The pins on the end of the ford wires look like this:
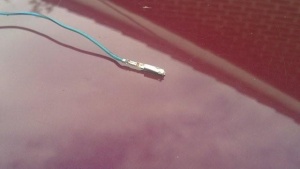 But the pins to each of the connectors (2 in the fusebox and one in the clockspring) are different so an old loom from a scrapyard is really needed.
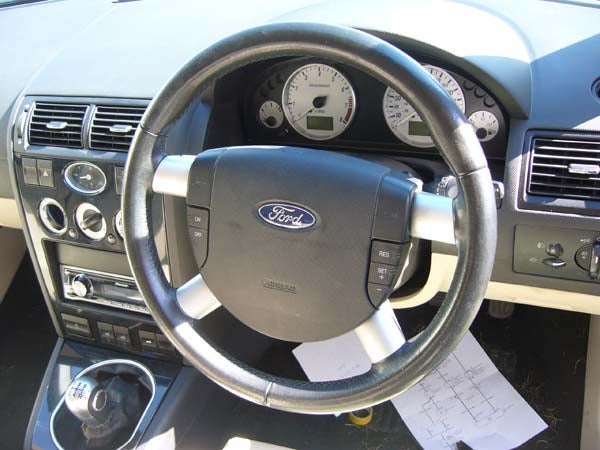
Depending on your airbag then you will either need just the cruise buttons & a stanley knife with careful use or you will need a new airbag with cruise buttons if you dont fancy the cutting route ( i went with a new airbag as it came cheap ).
Piccies of the kit.
Fitting Instructions
Pedal Switches & Wiring Loom
The pedal switches simply twist to undo from the car.
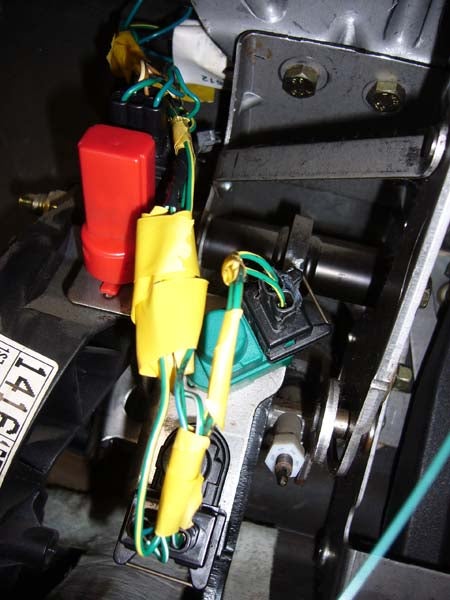
Then you need to reach up above the pedal assembly & unplug the switch loom form the rest of the wiring loom
( if you dont have this plug then the fitting of cruise could be more involved which is why its best to check for this plug 1st )
Now refit the cruise loom & switches as shown in the piccy below.
Making The Cruise Pedal Switch Loom From Your Old One
Parts Required. Standard Pedal Switch's Loom ( from your mota or a scrapped mota will do ). 2x suitable connection plugs ( either from a suitable dash loom plug or another pedal loom connector plug ). 4x butt crimps ( or other suitable connection technique ). Pedal Switches & length of wiring loom from a mota with cruise ( mine came from a mota with no connector plug ).
Conversion
Get a standard loom & a cruise loom.
now cut one of the green/white wires on the standard loom as far away from the plug as you can ( only the on too )
now suitably size the same wire on the cruise plug ( they are numbered on the plug & if you cant see that then just put the
plugs the same way round to match em up etc ) & bare both cut ends & then join together with your preferred method of joining.
do the same for the other green/white wire.
now remove the brown & white wires from the standard clutch pedal plug ( remove the plug from the switch & prise out the tab
from inside the switch & then using a small flat screwdriver unclip the little locking clip found below the tab & the wires
should just pull out with the connections still attached ).
do the same for the cruise plug but this time one at once, replacing the wire you remove with the same coloured one from your
standard plug before your move onto the next wire ( just put the left over wires to one side for later disposal ).
put the locking tab back into the plug & put the plug back on the switch.
you should now only have 2 wires left to connect up & all the standard switch's/plugs on the side not connected to anything.
the last 2 connections will require the connections from a scrapped loom plug.
bare the ends of each wire & make 2 full wires out of the 4 you have.
partially remove the locking tab.
now the green/blue wire from the clutch pedal switch needs to end up in the empty hole marked 6 ( it should just click into
place ).
the green/yellow wire brom the extra brake pedal switch needs to go into the hole marked 3.
now push the locking tab back into place
you will end up with something like this
tidy the loom up a little so there is no dangling wires & then fit.
Dash Wiring
fitting is the easy bit really if you can get the wires with proper ford connections on em.
remove the lower drivers side dash panel & glovebox.
remove the 2 sides of the central console ( for easier wire routing ).
remove the lower steering column cover.
unplug the wiring to the clockspring.
unplug the green & grey wiring plugs from the fusebox ( see piccy below for which plugs these are ).
plug the wires in to the proper plugs as follows :-
C502 pin 8 - clockspring pin 7
C32 Pin 13 - clockspring pin 6
C32 Pin 7 - clockspring pin 5
If wanting to wire for the speedo cluster symbol if your feeling lucky then do the following too
C32 Pin 1 - speedo cluster plug pin 13
once done then put the plugs back where they were removed from.
now remove the airbag & either replace or modify it as required to fit the cruise bottons.
check for airbag problems now before you re-assemble by turning the ignition switch on & waiting till the warning light goes out, if it stays out then your fine, if it flash's then count the flash's & consult the following list to see whats up.
now re-build the interior.
Fitting The Cruise Module
open bonnet.
remove the passenger side strut top cover ( if fitted ).
undo the 3x 13mm holding the strut to the car.
undo the 2x 13mm bolts holding the strut top plate to the wing.
undo the 2x 8mm bolts holding the inner edge of the plate to the brace bar along the back of the engine bay.
remove the plate.
( you may now need to undo the other 3-4x 8mm bolts along the rest of the bar & remove the bar too as it may get in the way ).
disconnect the wiring from the holding plug in the wing ( and also remove the holding plug from the car ).
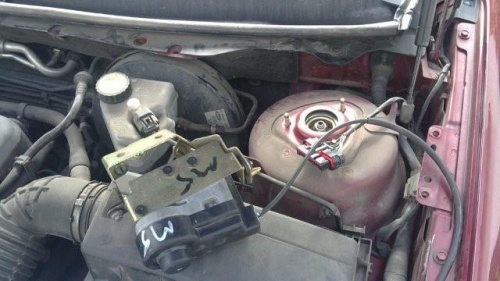
Put the bracket inplace followed by the module ( it may be a squeeze before it goes in properly - also dont forget to plug it in too before finally putting it inplace as the main wiring loom may get in the way once the module is inplace ).
( piccy so you can see why all that removal & the wiring that gets in the way etc )
jack up the front passenger wheel & remove it.
undo the rearward side of the wheel arch liner ( if mud flaps are fitted then that will have to be removed too ).
now bend the liner out of the way to access the 3 bolts of the bracket.
fasten on the 3 x M6 nuts on the fixing bracket bolts.
re-assemble the mota.
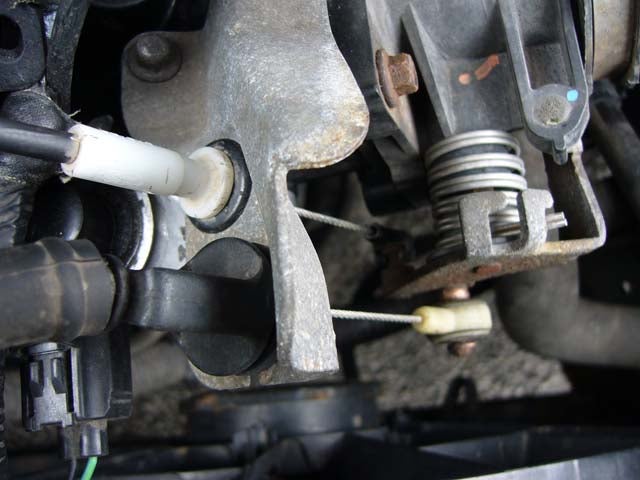
route the cruise cable from the cruise module to the throttle body & connect it up to the empty peg on the throttle body.
Testing
Go for a drive.
get upto 30mph+ on a suitable road.
press ON.
Now press SET & this should keep the car at the speed your doing ( & also bring on the cruise symbol on the LCD if the
cluster is programmed & you added the extra wie ).
press the + & - buttons to make sure the speed goes up & down properly as they should
( make sure the road is clear behind you )
press the RES button & the cruise should switch off & the car slow down, now let the car slow down by about 5 mph & then
press the RES button again & the car should speed up to the last set speed on its own.
now press the OFF button & the cruise should switch off.






 Your Privacy Choices