Registrations
We now manually approve all new user accounts due to a large influx of spam bots. Accounts are normally approved within 48 hours.
If you need any help with using this Wiki, please ask here: TalkFord.com Wiki Submission Forum
Difference between revisions of "Headlamp beam deflectors"
52graphite (Talk | contribs) |
52graphite (Talk | contribs) m (vinyl recommendation) |
||
| (20 intermediate revisions by 4 users not shown) | |||
| Line 1: | Line 1: | ||
| + | {{note|'''The Ford Mondeo hit our roads in 1993, and has consistently been a sales success. Now on its 4th incarnation, it remains a drivers favourite.'''<br> | ||
| + | '''For more information, visit the [http://www.talkford.com/forum/596-mondeo/ Ford Mondeo] forum on [http://www.talkford.com TalkFord.com], the definitive resource site covering all Fords from the present day to the 1970's.'''}} | ||
| + | ---- | ||
| + | {{Infobox | ||
| + | |name = Infobox Template | ||
| + | |bodystyle = float:right; valign:top; | ||
| + | |image = [[File:Fordwiki infobox.png]] | ||
| + | |imagestyle = | ||
| + | |caption = Overview Guide | ||
| + | |captionstyle = | ||
| + | |headerstyle = background:#ccf; | ||
| + | |labelstyle = background:#ddf; | ||
| + | |datastyle = text-align:right; | ||
| + | |header1 = | ||
| + | |label1 = Ford Model: | ||
| + | |data1 = '''Mondeo''' | ||
| + | |header2 = | ||
| + | |label2 = Petrol/Diesel: | ||
| + | |data2 = '''???''' | ||
| + | |header3 = | ||
| + | |label3 = Estimated Cost: | ||
| + | |data3 = '''???''' | ||
| + | |header4 = | ||
| + | |label4 = Difficulty? | ||
| + | |data4 = '''???''' | ||
| + | |label5 = How long does this take? | ||
| + | |data5 = '''???''' | ||
| + | }} | ||
| + | This page provides templates for beam deflectors to use when taking your car to a country where they drive on the wrong side of the road (or if you're LHD, the correct side of the road). | ||
| − | + | Use the templates to mask off your lights using suitable waterproof tape. Black sign-writers' self-adhesive vinyl makes an excellent masking material. The diagrams are self-explanatory even without the numbered labels. | |
| − | + | '''Note: Right and Left, in this document, refer to the vehicle right and left as you are sitting in the vehicle looking forwards.''' | |
| − | + | = Mk2 = | |
| − | + | The Mk2 instructions are reversible. The headlamp pictures are for a LHD vehicle, so look at your screen in a mirror for RHD. The templates are for nearside and offside, and should be flipped over as appropriate (striped side out on LHD, in on RHD). | |
| − | === RH lamp | + | == Nearside == |
| + | |||
| + | [[Image:Lhd-lhl2.jpg]] | ||
| + | |||
| + | [[Image:Nst2.jpg]] | ||
| + | |||
| + | == Offside == | ||
| + | |||
| + | [[Image:Lhd-rhl2.jpg]] | ||
| + | |||
| + | [[Image:Ost2.jpg]] | ||
| + | |||
| + | = Mk3 - halogen headlamps only = | ||
| + | |||
| + | == RHD, RH lamp == | ||
[[Image:Rhd-rhl.jpg]] | [[Image:Rhd-rhl.jpg]] | ||
| Line 14: | Line 57: | ||
[[Image:Rhd-rht.jpg]] | [[Image:Rhd-rht.jpg]] | ||
| − | == | + | == RHD, LH lamp == |
[[Image:Rhd-lhl.jpg]] | [[Image:Rhd-lhl.jpg]] | ||
| Line 20: | Line 63: | ||
[[Image:Rhd-lht.jpg]] | [[Image:Rhd-lht.jpg]] | ||
| − | == LHD | + | == LHD, RH lamp == |
| − | + | ||
| − | + | ||
[[Image:Lhd-rhl.jpg]] | [[Image:Lhd-rhl.jpg]] | ||
| Line 28: | Line 69: | ||
[[Image:Lhd-rht.jpg]] | [[Image:Lhd-rht.jpg]] | ||
| − | == | + | == LHD, LH lamp == |
[[Image:Lhd-lhl.jpg]] | [[Image:Lhd-lhl.jpg]] | ||
[[Image:Lhd-lht.jpg]] | [[Image:Lhd-lht.jpg]] | ||
| + | |||
| + | = Mk3 - Xenon (HID) headlamps only = | ||
| + | |||
| + | * Open bonnet. | ||
| + | * Remove the front grille by twisting the 2 turnknobs. | ||
| + | * Remove the headlamps from the car by lifting the 2 release levers and disconnecting the elec. connector. | ||
| + | * Remove the rear cover from the lamp, by removing the 2 screws and pulling up the locking tab. | ||
| + | * Turn the bulb alignment lever to the required position: Normal position "0" for the UK, or Travel position "T" for driving in continental Europe. | ||
| + | * Replace the rear cover. | ||
| + | * Refit the headlamps and front grille. | ||
| + | * It is recommended to have the headlamp alignment checked after this procedure. | ||
| + | |||
| + | Alternatively, if you are not inclined to carry out this work, or not prepared to pay a garage to do so, headlamps can be masked using 'Eurolites' masking stickers available in motoring accessory shops. | ||
| + | |||
| + | = Mk4 = | ||
| + | |||
| + | == Without cornering lamps == | ||
| + | |||
| + | X should be 100mm: adjust scaling as appropriate. The clear bit of the template is a guide; the shaded bit is the mask itself. | ||
| + | |||
| + | === RHD, RH lamp === | ||
| + | |||
| + | [[Image:Rhrl4.jpg]] | ||
| + | |||
| + | [[Image:Rhrt4.jpg]] | ||
| + | |||
| + | === RHD, LH lamp === | ||
| + | |||
| + | [[Image:Rhll4.jpg]] | ||
| + | |||
| + | [[Image:Rhlt4.jpg]] | ||
| + | |||
| + | === LHD, RH lamp === | ||
| + | |||
| + | [[Image:Lhrl4.jpg]] | ||
| + | |||
| + | [[Image:Lhrt4.jpg]] | ||
| + | |||
| + | === LHD, LH lamp === | ||
| + | |||
| + | [[Image:Lhll4.jpg]] | ||
| + | |||
| + | [[Image:Lhlt4.jpg]] | ||
| + | |||
| + | == With cornering lamps == | ||
| + | |||
| + | |||
| + | * [[Headlight_Removal_%E2%80%93_Mk4|Remove the headlamps from the car]]. | ||
| + | * Remove the rear cover from the lamps. | ||
| + | [[Image:Mk4-headlamp-lever-AFS_AA_IMG_5460 copy.jpg]] | ||
| + | * Move the lever behind up or down to adjust the beam as appropriate. | ||
| + | [[Image:Mk4-headlamp-lever-AFS_BA_P5272137 copy.jpg]] | ||
| + | |||
| + | [[Image:Mk4-headlamp-lever-AFS_CA_P5272136 copy.jpg]] | ||
| + | * Replace the rear cover. | ||
| + | * Refit the headlamps. | ||
| + | |||
| + | [[Category:Mondeo_Mk2]] | ||
| + | [[Category:Mondeo_Mk3]] | ||
| + | [[Category:Mondeo_Mk4]] | ||
Latest revision as of 08:07, 22 August 2011
For more information, visit the Ford Mondeo forum on TalkFord.com, the definitive resource site covering all Fords from the present day to the 1970's.
|
Overview Guide | |
| Ford Model: | Mondeo |
|---|---|
| Petrol/Diesel: | ??? |
| Estimated Cost: | ??? |
| Difficulty? | ??? |
| How long does this take? | ??? |
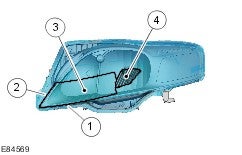
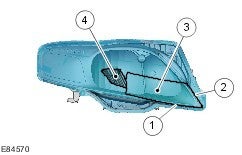
This page provides templates for beam deflectors to use when taking your car to a country where they drive on the wrong side of the road (or if you're LHD, the correct side of the road).
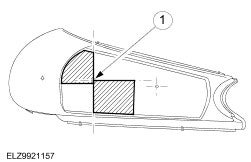
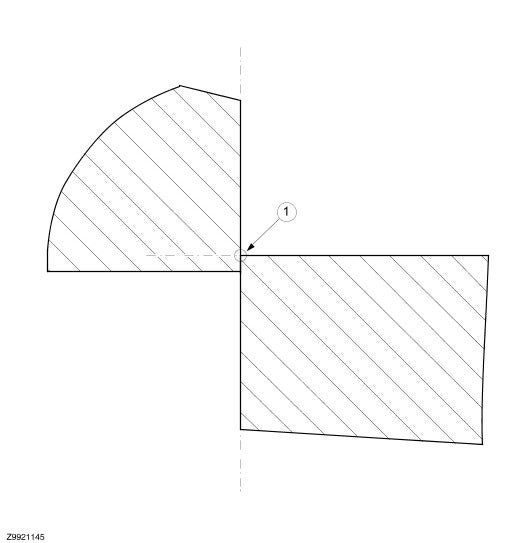
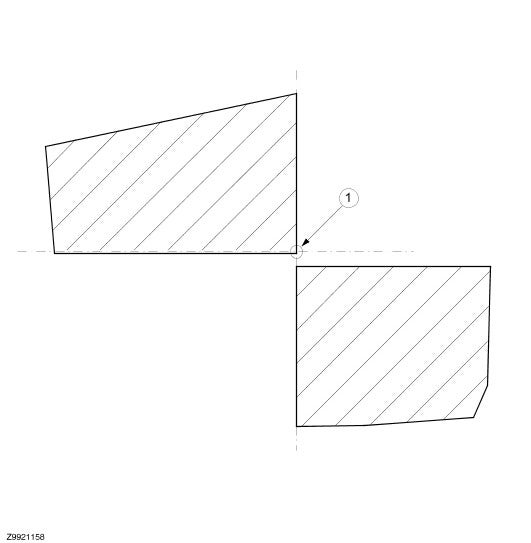
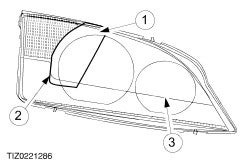
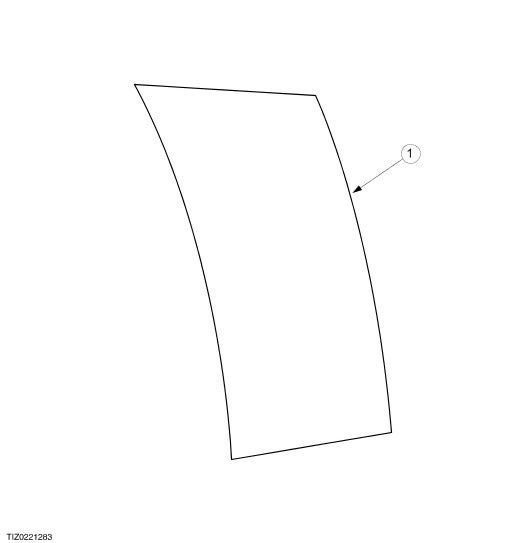
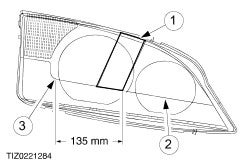
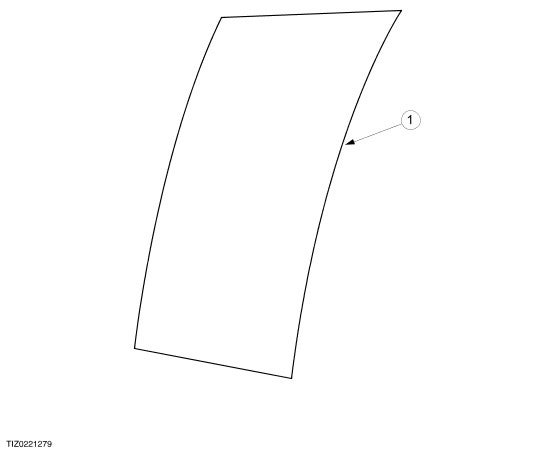
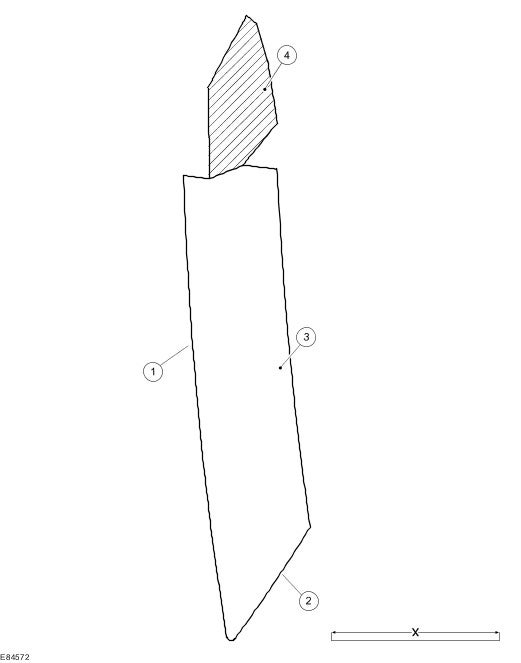
Use the templates to mask off your lights using suitable waterproof tape. Black sign-writers' self-adhesive vinyl makes an excellent masking material. The diagrams are self-explanatory even without the numbered labels.
Note: Right and Left, in this document, refer to the vehicle right and left as you are sitting in the vehicle looking forwards.
Contents
Mk2
The Mk2 instructions are reversible. The headlamp pictures are for a LHD vehicle, so look at your screen in a mirror for RHD. The templates are for nearside and offside, and should be flipped over as appropriate (striped side out on LHD, in on RHD).
Nearside
Offside
Mk3 - halogen headlamps only
RHD, RH lamp
RHD, LH lamp
LHD, RH lamp
LHD, LH lamp
Mk3 - Xenon (HID) headlamps only
- Open bonnet.
- Remove the front grille by twisting the 2 turnknobs.
- Remove the headlamps from the car by lifting the 2 release levers and disconnecting the elec. connector.
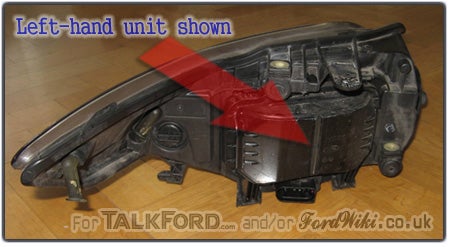
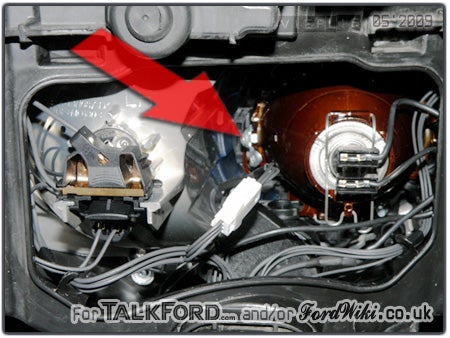
- Remove the rear cover from the lamp, by removing the 2 screws and pulling up the locking tab.
- Turn the bulb alignment lever to the required position: Normal position "0" for the UK, or Travel position "T" for driving in continental Europe.
- Replace the rear cover.
- Refit the headlamps and front grille.
- It is recommended to have the headlamp alignment checked after this procedure.
Alternatively, if you are not inclined to carry out this work, or not prepared to pay a garage to do so, headlamps can be masked using 'Eurolites' masking stickers available in motoring accessory shops.
Mk4
Without cornering lamps
X should be 100mm: adjust scaling as appropriate. The clear bit of the template is a guide; the shaded bit is the mask itself.
RHD, RH lamp
RHD, LH lamp
LHD, RH lamp
LHD, LH lamp
With cornering lamps
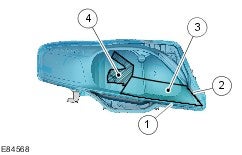
- Remove the headlamps from the car.
- Remove the rear cover from the lamps.
- Move the lever behind up or down to adjust the beam as appropriate.
- Replace the rear cover.
- Refit the headlamps.










 Your Privacy Choices