Registrations
We now manually approve all new user accounts due to a large influx of spam bots. Accounts are normally approved within 48 hours.
If you need any help with using this Wiki, please ask here: TalkFord.com Wiki Submission Forum
Difference between revisions of "Headlight Removal – Mk4"
| Line 46: | Line 46: | ||
When tightening the two Torx T-30 screws, tighten the front screw first and the rear screw afterwards. | When tightening the two Torx T-30 screws, tighten the front screw first and the rear screw afterwards. | ||
| + | |||
| + | '''Removal and fitting in winter''' | ||
| + | |||
| + | If need to change bulb(-s) arises in deep winter, you may be willing to prevent frost-inhibited damage. Torx screw affixing point plastics on headlamp unit and car body may eventually become fragile and/or less flexible due to frost. Remove the headlamp when the engine bay is warm, i.e., when it has been running for some time. Set headlamp switch to "0" prior to removal. Removal and refitting whilst engine is running has no side-effects, except for "Low beam bulb fault" warning message which won't go away until the next ignition cycle. | ||
| + | |||
| + | As proved in practice in two isolated cases on a car with 2.0 petrol engine, removing and fitting of headlamp unit in the midst of a journey at ambient temperature -14° with engine running didn't surface any problems, whilst during fitting at ambient temperature -8° on a cold car the Torx affixing point plastic on headlamp unit was suspiciously stiff and final tightening of Torx screws was put aside until engine warms up the engine bay. | ||
| + | |||
Revision as of 16:33, 14 January 2010
[This article refers to Mk4 Mondeo]
Tools needed for headlamp unit removal:
Torx T-30, cross-blade screwdriver, eventually also small flat-blade screwdriver.
Removal
(1) Open the bonnet :)
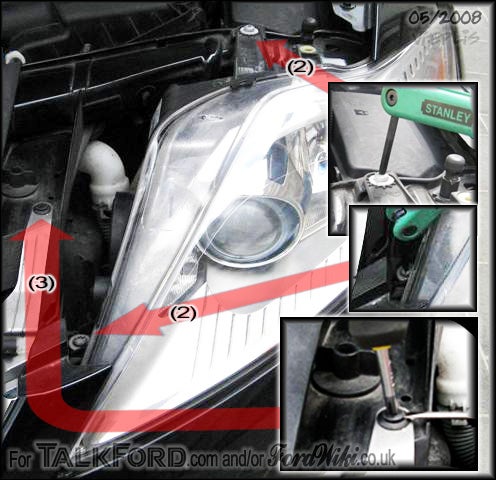
(2) Remove two screws (Torx T-30).
(3) Remove the plastic screw and retainer. If the plastic screw doesn't come out, facilitate it by placing a small flat-blade screwdriver between the screw and the retainer and lifting the screw up.
(4) Pull the corner of the grille and bumper towards the front of the car and
(5) lift the corner of the headlamp and push it as far as possible towards the back of the car.
Aim of steps (4) and (5) is to move the headlamp front corner behind the bumper/grille.
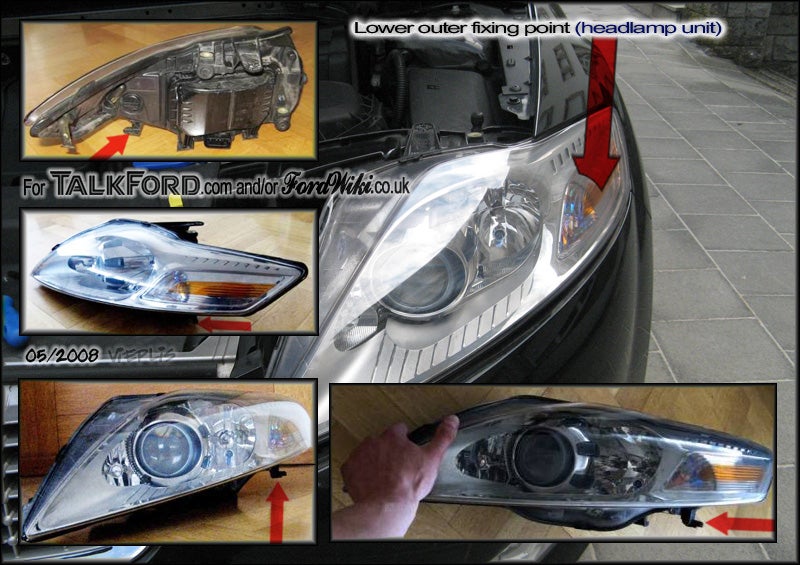
(6) Pull the headlamp towards the centre of the vehicle, behind the grille and bumper, to disengage it from the lower outer fixing point (see subsequent pictures).
(7) Remove the headlamp by moving the headlamp towards the front / to the right.
Steps (6) and (7) are done almost simultaneously.
(8) Unclip the connector, and the headlamp unit is yours.
For location of lower outer fixing point (car body and headlamp unit), see the following pictures.
Some people claim that they have successfully omitted removal step (3).
Fitting
Fitting - in reverse order.
When tightening the two Torx T-30 screws, tighten the front screw first and the rear screw afterwards.
Removal and fitting in winter
If need to change bulb(-s) arises in deep winter, you may be willing to prevent frost-inhibited damage. Torx screw affixing point plastics on headlamp unit and car body may eventually become fragile and/or less flexible due to frost. Remove the headlamp when the engine bay is warm, i.e., when it has been running for some time. Set headlamp switch to "0" prior to removal. Removal and refitting whilst engine is running has no side-effects, except for "Low beam bulb fault" warning message which won't go away until the next ignition cycle.
As proved in practice in two isolated cases on a car with 2.0 petrol engine, removing and fitting of headlamp unit in the midst of a journey at ambient temperature -14° with engine running didn't surface any problems, whilst during fitting at ambient temperature -8° on a cold car the Torx affixing point plastic on headlamp unit was suspiciously stiff and final tightening of Torx screws was put aside until engine warms up the engine bay.
Submitted by vieplis


 Your Privacy Choices