Registrations
We now manually approve all new user accounts due to a large influx of spam bots. Accounts are normally approved within 48 hours.
If you need any help with using this Wiki, please ask here: TalkFord.com Wiki Submission Forum
Difference between revisions of "Rear Wheel Bearing"
52graphite (Talk | contribs) (→Reassembly) |
52graphite (Talk | contribs) (→Remove the hub) |
||
| Line 114: | Line 114: | ||
You can now finally see the part that you're going to replace. When you remove it, the brake backplate will also come off, so familiarize yourself with its orientation. | You can now finally see the part that you're going to replace. When you remove it, the brake backplate will also come off, so familiarize yourself with its orientation. | ||
| − | # Undo and remove the four | + | # Undo and remove the four bolts holding the hub and backplate onto the lower arm, which may be T50 or E12 Torx type. You may need to clean the edge of the access hole to get your tool through. Be '''very''' careful not to round off the bolt - use a wire brush or other tool to clean it up first. |
# Remove the hub. It is a snug fit into a hole on the lower arm - again, see your new hub to get an idea of your adversary. I needed to use several hammer blows to remove it, which may well have caused irreparable damage to the bearing, so make sure your new part looks like the old one before you proceed! | # Remove the hub. It is a snug fit into a hole on the lower arm - again, see your new hub to get an idea of your adversary. I needed to use several hammer blows to remove it, which may well have caused irreparable damage to the bearing, so make sure your new part looks like the old one before you proceed! | ||
Revision as of 09:01, 21 December 2009
This article applies to all Mk3 Mondeos. The part is common with Jaguar X-Type, so the instructions may work there, too - no promises.
Contents
Warning
It's worth getting a Haynes manual (Amazon: preface / facelift) despite having this guide, as you shouldn't go trusting your safety to some random community-editable resource you found on the internet. This should be treated as a clarification and expansion to the Haynes guide, not a replacement. The pictures and guide below refer to the replacement on a pre-facelift hatchback, although I've tried to note differences for other variants.
If you follow this guide, you're going to be working underneath a car that is jacked up with the handbrake off; you're going to be replacing the bits that hold the rear wheels on; and you'll be removing and re-fitting the rear brakes in the process. If you don't feel confident with that responsibility, get a qualified mechanic with insurance to do it.
As with all articles, the author, MEG and FordWiki accept no liability for injuries or damage incurred through following this article, or for inaccuracies therein.
Symptoms
A worn rear wheel bearing may show various symptoms:
- Play in the wheel: jack the car up and see if you can wobble the wheel side to side. There should be no play at all.
- Steady "thrum", maybe peaking at certain speeds and on certain surfaces
- Grinding noise, perhaps getting worse or better on corners as the weight distribution and lateral load changes
Make sure you're not misdiagnosing poor wheel balance or dodgy tyres. If you're at all uncertain, swap your wheels front-to-back and see if the noise remains.
What you'll need
Parts
The bearing itself is not available separately - you replace the entire hub assembly.
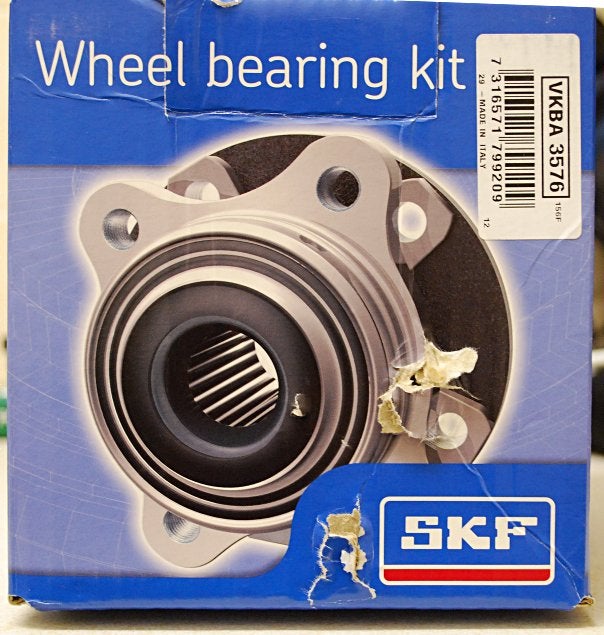
- A new hub. Your options here are: buy from your Ford dealer (expensive, around £200 per side); buy the same part elsewhere (SKF part VKBA 3576, can be found for around £100, try here; buy a cheaper pattern part (around £50); get a secondhand hub.
- Bolts. The SKF kit comes with new bolts. Otherwise, re-use your old ones or preferably (as these are holding your rear wheels on) buy a set of 4 new ones per side from your Ford dealer (about 30p each). FINIS code?
I chose the SKF kit as it's the same as the OEM fit part which lasted well over 100k miles on my car. For the cost of a couple of tanks of petrol, I chose not to gamble with unknown bearings. Having said that, other MEGgers have fitted the cheaper hubs and had months and thousands of miles of success. Your call.
The danger with used hubs is that some force may be required to remove them from the original car, which could damage the internal bearings.
Here's the SKF box - note that the picture on the box is a generic hub picture, not the Mondeo part!
Tools
- Jack
- Axle stand
- Wheel chocks - you're working on a car with the handbrake off and the rear wheel jacked up. Don't take chances here.
- Wheel brace
- Long-reach Torx T50 bit. The bolts holding the hub to the car are accessed through a small hole (diameter 18mm). You'll need at least 3" of extension bar to get to it. 3/8" drive sockets should fit through the hole; 1/2" ones won't.
- If you use the bolts in the SKF kit, you'll need a Torx E12 socket - again, 3/8" drive with an extension, to fit through the hole. Halfords sell these. Although a 10mm standard socket fits an E12 bolt, don't be tempted to try to use this as you'll mess up the bolt and removal will be really difficult.
- Thread lock compound - SKF bolts are pre-treated with some blue gunk, otherwise apply your own.
- Torx T25 bit to undo the ABS sensor. Haynes recommends removing it, presumably to avoid damage, but it isn't necessary and I didn't. If you do choose to remove it and your replacement has a different fastener, you'll need a tool for that too.
- Torque wrench. Bolt torque is important, and the hub bolts aren't the place to go guessing.
- You'll probably also need a rubber or wooden mallet, or a hammer an a piece of wood. The disc and the hub are likely not to just drop off...
- Adjustable spanner or long-handled 13mm spanner for the caliper bolts, plus a 13mm socket for your torque wrench. One of the bolts isn't accessible with a standard-size 13mm 1/2" drive socket, hence the spanner.
- Big screwdriver for use as a lever for the handbrake cable removal.
- Molegrips or similar to grip the cable end for the handbrake cable removal.
- Copper grease for reassembling the caliper.
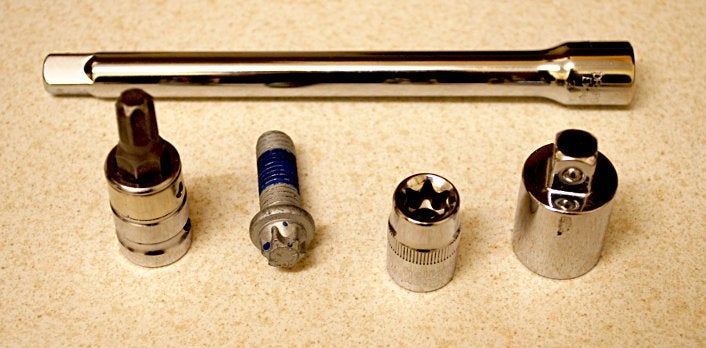
Some tools shown below - 6" long 3/8" drive extension bar at the back, fronted by a T50 bit, E12 bolt from the SKF kit, E12 socket and a 3/8" to 1/2" adaptor for my 1/2" drive socket set and torque wrench.
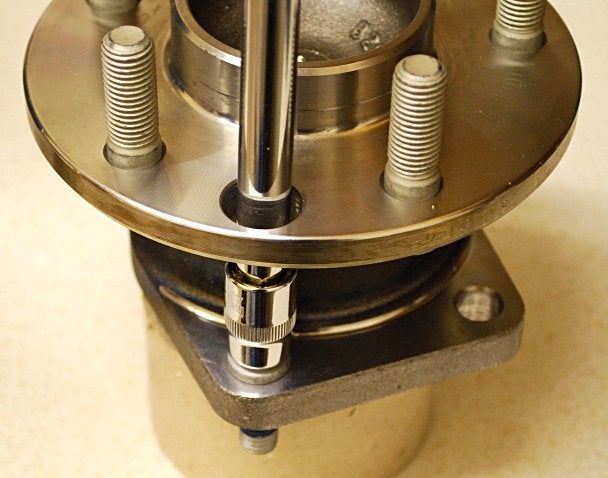
Here's how the bolt is accessed. My 6" bar is unnecessarily long - a 3" would be fine. The distance between the top faces of the two surfaces is 51mm.
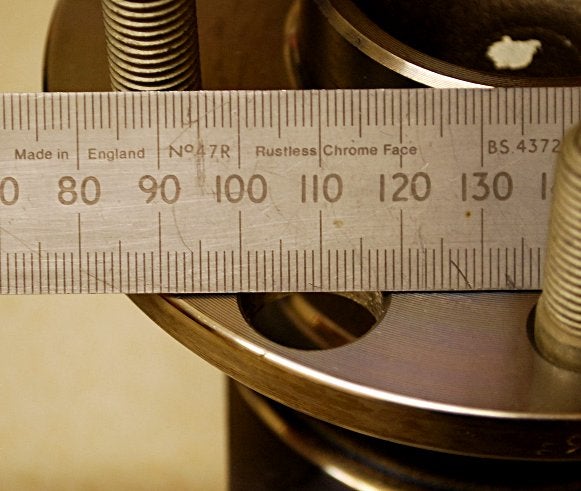
The access hole on the SKF hub (as factory-fitted) is 18mm diameter. The old hub's hole is likely to be smaller due to corrosion and gunk - you may need to clean it out a bit. Make sure your tools will fit through that.
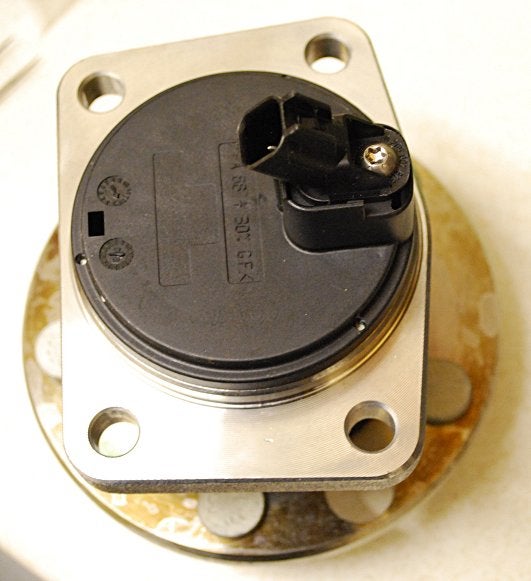
Here's the ABS sensor on the rear of the hub:
Method
Detailed instructions under construction, photos to follow
Remove the wheel
- Chock the front wheels.
- Put the transmission into first or reverse (maximum braking effect on the front wheels).
- Loosen the wheelnuts on the rear wheel slightly.
- Release the handbrake.
- Jack the car up at the appropriate point and support with an axle stand. You're going to be applying a fair bit of force to the car, so ensure it's well supported. The single jacking and supporting point makes this tricky: you need to place the jack and stand close together. I leave both in place as a belt-and-braces approach. Don't try to do this job using just the car's standard jack.
- Remove the wheelnuts and the roadwheel.
Disconnect the handbrake cable
This is the hardest part of the job, unless something else is stuck fast. You need to release the handbrake cable from the lever on the back of the brake caliper, working against a strong spring. The spring you're fighting is internal to the caliper and not the visible one, so don't bother removing that. Throughout this procedure, be very careful to avoid damage to the rubber brake pipe.
- You did release the handbrake as advised above, didn't you? If not, be very careful that releasing it now doesn't destabilize your jack and stand.
- Using the biggest screwdriver you can find for leverage, push the lever forwards enough to grip the ferrule on the end of the cable with the molegrips. Now push the lever further forwards whilst pulling the cable to release it from the lever. Because of the forces involved, a) be certain your car is well supported and b) try not to lose too much flesh if something slips unexpectedly. I found it easiest to insert the screwdriver from underneath the arm for optimum leverage.
- Now release the metal clip securing the cable outer to the fixed part of the arm by pushing its tab towards the centre of the car. Try not to lose it as it pings off.
- The handbrake cable should now be free to remove from the caliper.
Disconnect the ABS sensor wiring
On the back of the hub, the ABS cable plugs into the sensor on the hub. Unplug this connector - you may need to insert a small flat-bladed screwdriver into the top of the connector to release the catch. Take a look at the sensor on your new hub to see what you're up against if you have difficulty. You shouldn't need to use a lot of force if you get it right.
Remove the caliper and bracket
There are four 13mm bolts to undo here. The two nearest the centre of the hub are the bracket bolts. If you can undo those directly, do so and remove the caliper and bracket as a single unit. I could not get to them with the tools I had to hand, so the easy way is:
- Undo the lower caliper bolt and swivel the caliper upwards.
- Undo the upper caliper bolt, remove the caliper and support it such that the flexible brake line is not under any stress. I used a bungee cord on the suspension coil spring to support it.
- Remove the outer brake pad - pull on the metal loops (pre-facelift only). You may need to clean up the area with a wire brush or scraper before it'll move. Do not breathe in the dust - use a vacuum cleaner to keep the area clean.
- Undo the two mounting bracket bolts which should now be accessible. These ought to be much tighter than the caliper bolts.
- Remove the caliper bracket and inner pad from the disc. Make sure the inner pad doesn't fall out.
Remove the brake disc
- Using thin pliers or a small screwdriver to start with, undo the two star-type washers that retain the disc onto the hub. They should unscrew from the studs by hand, but be careful on the sharp edges.
- Remove the disc from the hub. You're likely to need to apply some persuasion here, but avoid sharp impacts to the disc. I used a hammer and a piece of wood to soften the blow. Repeated strikes to the back face of the disc whilst turning it gradually freed it. Do not allow the disc to fall onto the floor!
Remove the hub
You can now finally see the part that you're going to replace. When you remove it, the brake backplate will also come off, so familiarize yourself with its orientation.
- Undo and remove the four bolts holding the hub and backplate onto the lower arm, which may be T50 or E12 Torx type. You may need to clean the edge of the access hole to get your tool through. Be very careful not to round off the bolt - use a wire brush or other tool to clean it up first.
- Remove the hub. It is a snug fit into a hole on the lower arm - again, see your new hub to get an idea of your adversary. I needed to use several hammer blows to remove it, which may well have caused irreparable damage to the bearing, so make sure your new part looks like the old one before you proceed!
Reassembly
Clean everything up fully before reassembly.
Reassemble by reversing the above sequence. Notes:
- Hub to lower arm bolt torque: 70Nm. Be sure the hub is properly seated in the hole before you apply final torque.
- To reassemble the caliper, first fit the bracket. The two bolts do up to 80Nm (cars built to 09/2004) or 66Nm (cars built after 09/2004); use a drop of threadlock on each. Replace the outer pad. Apply copper grease sparingly on the outer face of both pads where the caliper makes contact. Don't get any on the braking surface!
- Refit the caliper in its "swivelled-up" position, fixing with the top bolt only. Swivel the caliper down over the pads, which may need a few smacks from the palm of your hand to re-seat it. Fit the lower bolt. Both bolts do up to 30Nm - I could only get the torque wrench on the top one, then estimated a similar force on the bottom one.
- Replace the handbrake cable using a similar levering technique to removal. Remember to refit the C-clip that retains the cable outer.
- Don't forget to reconnect the ABS wiring!
Completion
- Refit the roadwheel and do up the nuts to "pinch-tight".
- Make sure the wheel turns freely (excepting slight brake friction) and has no play in it.
- Lower the car and tighten the wheelnuts to the correct torque.
- Apply the handbrake and carefully remove the chocks, checking for handbrake operation.
- Take the car for a very careful drive on quiet roads, ensuring the brakes operate as expected and that there are no unexpected noises or vibrations.
That is all.
 Your Privacy Choices