Registrations
We now manually approve all new user accounts due to a large influx of spam bots. Accounts are normally approved within 48 hours.
If you need any help with using this Wiki, please ask here: TalkFord.com Wiki Submission Forum
Difference between revisions of "Fitting A Dashboard Dimmer Switch"
m |
|||
| Line 13: | Line 13: | ||
1x dashboard dimmer switch (I got mine secondhand on [http://www.ebay.co.uk/ eBay] for £1.99) | 1x dashboard dimmer switch (I got mine secondhand on [http://www.ebay.co.uk/ eBay] for £1.99) | ||
| − | == | + | == Tutorial == |
Before you start, the area where your new dashboard dimmer switch will reside will look like this: | Before you start, the area where your new dashboard dimmer switch will reside will look like this: | ||
Revision as of 07:20, 28 April 2009
This is a very cheap and very easy modification to do to your mk2 Mondeo if you already have the wiring in place (this tutorial follows the modification on a 1998 LX model).
It took me about 5 minutes to do the whole job.
Things You Need
1x flat head screwdriver
1x Philips screwdriver
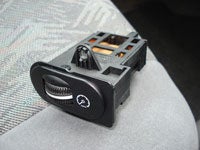
1x dashboard dimmer switch (I got mine secondhand on eBay for £1.99)
Tutorial
Before you start, the area where your new dashboard dimmer switch will reside will look like this:
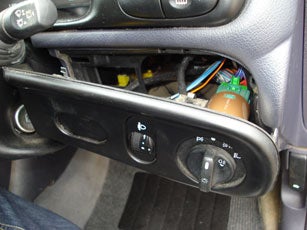
What you first need to do is pull this panel out - it is held in place by two metallic clips on the inside top of the panel. Be careful that you don't scratch the plastic steering column cowl when doing this:
Once you have pulled it out, you will need to disconnect the plugs going to the headlamp level switch (middle) and the headlight/foglight switch (right hand side). When you have done this you can pull the panel out even further:
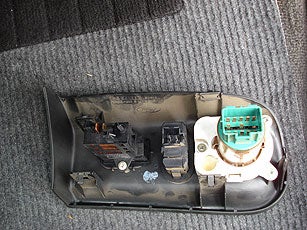
Next, remove the two screws holding the yellow plug and blanking plate in place. When you have doen this, prise the yellow plug off the blanking plate (use the flat head screwdriver to help do this), and then fit the dashboard dimmer switch in its place remembering to put the two screws back on to hold it in place:
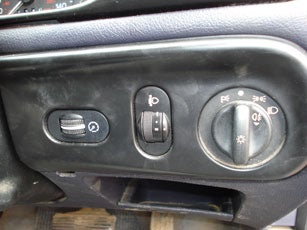
Now all you need to do is fit the yellow plug on to the dashboard dimmer switch, fit the other two plugs back on, and push the panel back into place (make sure the metal clips at the top of the panel are not bent - if they are just push them down so they are flat again).
The end result:
Submitted by Sam G


 Your Privacy Choices