Registrations
We now manually approve all new user accounts due to a large influx of spam bots. Accounts are normally approved within 48 hours.
If you need any help with using this Wiki, please ask here: TalkFord.com Wiki Submission Forum
Difference between revisions of "Thermostat replacement"
52graphite (Talk | contribs) m (Wiki-hosted images) |
52graphite (Talk | contribs) m (More encyclopaedic style, many typo fixes) |
||
| Line 1: | Line 1: | ||
| − | + | Applies to all Mk3 Mondeo with 1.8 or 2.0L petrol Duratec HE engines | |
| − | Symptom: | + | Symptom: car takes more than a few minutes to produce hot air on a cold winter's day, and even then, it's not as hot as it should be. You can also use the [[Instrument Cluster Self-Diagnostic Mode|cluster diagnosis tools]] to view your cylinder head temperature, which should reach 90-105°C after a few minutes driving, then stay there. |
Thermostats always fail in the open position. In the old days it cost 5 quid and took 5 minutes to change. On the Mk3 it has fancy electronics, costs 90 quid and the garage will quote you at least 60 quid to fit it. It's in a terrible location behind the power steering pump. | Thermostats always fail in the open position. In the old days it cost 5 quid and took 5 minutes to change. On the Mk3 it has fancy electronics, costs 90 quid and the garage will quote you at least 60 quid to fit it. It's in a terrible location behind the power steering pump. | ||
| − | + | This is a conceptually pretty simple procedure to do, it's just in a very tight place you have to get to which takes time and skin off your hands. The hardest bit is removing the hose - if that goes OK, you should have no problems. Otherwise, put it all back together and visit your local friendly mechanic with your parts. | |
| − | + | Let's get started - make sure you have all the right parts, these are all the tools needed - | |
| − | + | ||
| − | + | ||
| − | + | ||
| − | + | ||
| − | + | ||
| − | + | ||
| − | Let's get started - make sure you have all the right parts, these are all the tools | + | |
1 - New Thermostat in housing (£75 from ebay) | 1 - New Thermostat in housing (£75 from ebay) | ||
| − | 2 - | + | 2 - pliers |
3 - magnetic tool (for those dropped screws...) | 3 - magnetic tool (for those dropped screws...) | ||
4 - small ratched set (only need 10mm/8mm bits) | 4 - small ratched set (only need 10mm/8mm bits) | ||
| Line 26: | Line 19: | ||
[[File:Mk3ts1.jpg]] | [[File:Mk3ts1.jpg]] | ||
| − | Now out to the car, open up the bonnet and remove the front grill, there are two small plastic clips either end holding it in place, twist these and pop then off, the whole unit will then pop off, just don't force it so you don;t snap any of the small | + | Now out to the car, open up the bonnet and remove the front grill, there are two small plastic clips either end holding it in place, twist these and pop then off, the whole unit will then pop off, just don't force it so you don;t snap any of the small plastics holding it in place. |
[[File:Mk3ts2.jpg]] | [[File:Mk3ts2.jpg]] | ||
| Line 32: | Line 25: | ||
[[File:Mk3ts3.jpg]] | [[File:Mk3ts3.jpg]] | ||
| − | Now pop out the | + | Now pop out the driver's side headlamp, in the pic below are two small metal posts which just pull upwards to release the whole headlight. Unplug the electronic connector at the back and the headlight will wiggle free. |
[[File:Mk3ts4.jpg]] | [[File:Mk3ts4.jpg]] | ||
| Line 40: | Line 33: | ||
[[File:Mk3ts5.jpg]] | [[File:Mk3ts5.jpg]] | ||
| − | Now the headlight is out we have the essential access route to the | + | Now the headlight is out we have the essential access route to the thermostat. |
[[File:Mk3ts6.jpg]] | [[File:Mk3ts6.jpg]] | ||
| − | Below is the view that should greet you when you peer though the empty headlight socket. First remove the large coolant pipe | + | Below is the view that should greet you when you peer though the empty headlight socket. First remove the large coolant pipe using pliers on the clip. This is likely to be hard work and may take a few goes to move but keep at it and it should eventually move! |
[[File:Mk3ts7.jpg]] | [[File:Mk3ts7.jpg]] | ||
| Line 52: | Line 45: | ||
[[File:Mk3ts8.jpg]] | [[File:Mk3ts8.jpg]] | ||
| − | You will lose quite a bit of coolant when the big pipe is removed. Next undo the 3 nuts that hold the | + | You will lose quite a bit of coolant when the big pipe is removed. Next undo the 3 nuts that hold the thermostat in place (blue lines in pic). These are all quite hard to get to, you will lose skin, blood and possibly a nail. Be careful not to drop the nuts, or the magnetic tool may have to come out... |
| − | You may find it easier to undo the nut holding the power steering hose bracket | + | |
| − | When all 3 nuts are out you should be able to move the | + | You may find it easier to undo the nut holding the power steering hose bracket: this will give you a bit more room. |
| + | |||
| + | When all 3 nuts are out you should be able to move the thermostat into an easier position to remove the electrical connector and smaller hose. | ||
| − | Now everything is removed you can take out the | + | Now everything is removed you can take out the thermostat. Below is a picture of a faulty one, you can see that one of the plastic arms has snapped off causing it to stay in only one position. |
[[File:Mk3ts9.jpg]] | [[File:Mk3ts9.jpg]] | ||
| − | Now you can install your new thermostat ! | + | Now you can install your new thermostat! You should know how to do it now: place the small hose on first, then screw in the three bolts (this may take a while as it is so fiddly) then clip on the electrical connector and finally spend a while swearing at the large coolant pipe as you try and get the clip back on. If it's too hard you could always put a jubilee clip on. |
Nearly done, the thermostat is now fitted but we have lost a fair bit of coolant - this need to be topped up but with engine running and filler cap off as there will be air locks in the system which need time to reach the filler tank. Run the engine for about 10 mins revving to about 2500 rpm and checking the coolant level every min or so, keep doing this until the level remains constant and no longer drops. | Nearly done, the thermostat is now fitted but we have lost a fair bit of coolant - this need to be topped up but with engine running and filler cap off as there will be air locks in the system which need time to reach the filler tank. Run the engine for about 10 mins revving to about 2500 rpm and checking the coolant level every min or so, keep doing this until the level remains constant and no longer drops. | ||
Revision as of 06:31, 9 December 2010
Applies to all Mk3 Mondeo with 1.8 or 2.0L petrol Duratec HE engines
Symptom: car takes more than a few minutes to produce hot air on a cold winter's day, and even then, it's not as hot as it should be. You can also use the cluster diagnosis tools to view your cylinder head temperature, which should reach 90-105°C after a few minutes driving, then stay there.
Thermostats always fail in the open position. In the old days it cost 5 quid and took 5 minutes to change. On the Mk3 it has fancy electronics, costs 90 quid and the garage will quote you at least 60 quid to fit it. It's in a terrible location behind the power steering pump.
This is a conceptually pretty simple procedure to do, it's just in a very tight place you have to get to which takes time and skin off your hands. The hardest bit is removing the hose - if that goes OK, you should have no problems. Otherwise, put it all back together and visit your local friendly mechanic with your parts.
Let's get started - make sure you have all the right parts, these are all the tools needed -
1 - New Thermostat in housing (£75 from ebay) 2 - pliers 3 - magnetic tool (for those dropped screws...) 4 - small ratched set (only need 10mm/8mm bits) 5 - 4l bottle of engine coolant/antifreeze
You may need a torch too, even in good daylight.
Now out to the car, open up the bonnet and remove the front grill, there are two small plastic clips either end holding it in place, twist these and pop then off, the whole unit will then pop off, just don't force it so you don;t snap any of the small plastics holding it in place.
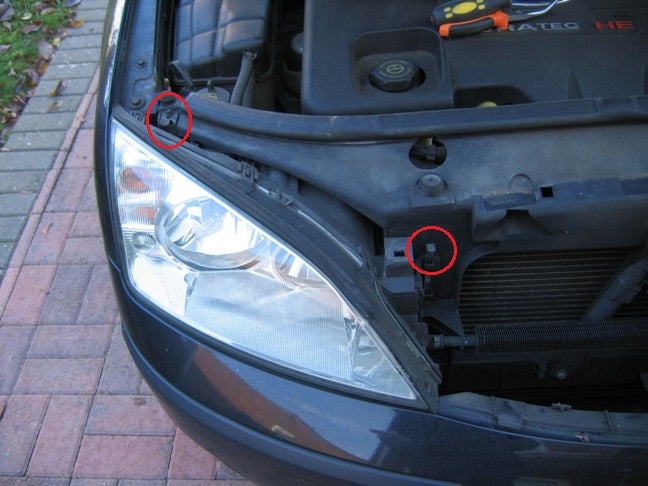
Now pop out the driver's side headlamp, in the pic below are two small metal posts which just pull upwards to release the whole headlight. Unplug the electronic connector at the back and the headlight will wiggle free.
Make sure you unplug the connector before you start pulling the headlight out
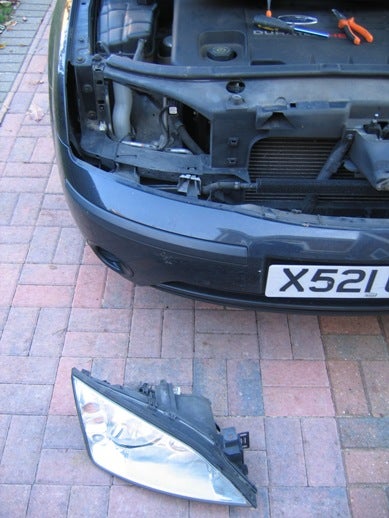
Now the headlight is out we have the essential access route to the thermostat.
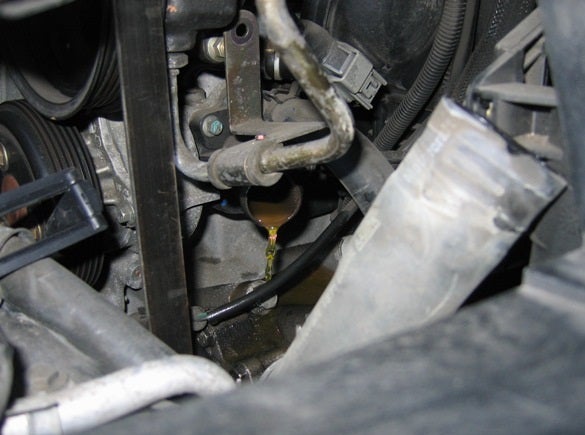
Below is the view that should greet you when you peer though the empty headlight socket. First remove the large coolant pipe using pliers on the clip. This is likely to be hard work and may take a few goes to move but keep at it and it should eventually move!
And now with the large hose removed...
You will lose quite a bit of coolant when the big pipe is removed. Next undo the 3 nuts that hold the thermostat in place (blue lines in pic). These are all quite hard to get to, you will lose skin, blood and possibly a nail. Be careful not to drop the nuts, or the magnetic tool may have to come out...
You may find it easier to undo the nut holding the power steering hose bracket: this will give you a bit more room.
When all 3 nuts are out you should be able to move the thermostat into an easier position to remove the electrical connector and smaller hose.
Now everything is removed you can take out the thermostat. Below is a picture of a faulty one, you can see that one of the plastic arms has snapped off causing it to stay in only one position.
Now you can install your new thermostat! You should know how to do it now: place the small hose on first, then screw in the three bolts (this may take a while as it is so fiddly) then clip on the electrical connector and finally spend a while swearing at the large coolant pipe as you try and get the clip back on. If it's too hard you could always put a jubilee clip on.
Nearly done, the thermostat is now fitted but we have lost a fair bit of coolant - this need to be topped up but with engine running and filler cap off as there will be air locks in the system which need time to reach the filler tank. Run the engine for about 10 mins revving to about 2500 rpm and checking the coolant level every min or so, keep doing this until the level remains constant and no longer drops.
Done, you should now have a warm car that knows what temperature it's running at and is not wasting fuel!


 Your Privacy Choices