Registrations
We now manually approve all new user accounts due to a large influx of spam bots. Accounts are normally approved within 48 hours.
If you need any help with using this Wiki, please ask here: TalkFord.com Wiki Submission Forum
Difference between revisions of "Centre Console Removal"
| Line 79: | Line 79: | ||
The console should now be free to remove. | The console should now be free to remove. | ||
| − | + | ||
[[Category:Mondeo_Mk3]] | [[Category:Mondeo_Mk3]] | ||
Revision as of 23:10, 20 February 2011
For more information, visit the Ford Mondeo forum on TalkFord.com, the definitive resource site covering all Fords from the present day to the 1970's.
|
Overview Guide | |
| Ford Model: | Mondeo |
|---|---|
| Petrol/Diesel: | ???? |
| Estimated Cost: | ???? |
| Difficulty? | ???? |
| How long does this take? | ???? |
Mk3 Centre Console Removal
Method
This is a step by step instruction as performed on a 2005 Mk3 Mondeo. Subtle differences may occur for pre-facelift cars. I have done the best I can to include every step, but please add in anything I may have missed! 1. First, you need to remove the two panels either side of the transmission tunnel. First you will need to remove the screw at the firewall end. Then panel is then held on by a series of clips. Pull on the panel starting at the trans tunnel end and finishing at the other end.
2. Remove the radio by inserting the radio removal tools and sliding the unit forwards. MAKE SURE YOU HAVE YOUR RADIO CODE before unplugging the unit.
3. Remove the gear-lever surround (this would be the wood section on Ghia and above cars) by levering off the rear first. You can do this by gripping the edge of the trim where the leather gaiter joins it and pulling sharply up. Be careful to support the trim as not to bend/break it. The trim will still be held on near the boot switch and pop-out cup holder. Pull at the boot-switch side first to release the clip, carefully supporting the trim so as not to bend or break it.
After you have lifted it up, unclip the leather gaiter from the bottom of the trim and manoeuvre the wood trim away. There's no need to remove the gear lever and gaiter but you may choose to do so for ease of access. If so, simply unscrew the gear knob and remove.
4. Remove the cup holder by removing the two screws circled in red and the remaining yellow screw. Slide out the cup holder and remove the remaining yellow screws.
5. Remove the screws holding on the side of the console trim, circled in red. These need to be removed from both sides.
6. Remove the Ashtray assembly by lifting with some force. Unplug the cigar-lighter and remove.
7. Now lift up the plastic trim around the gearlever. When you pull it forward, you will need to unplug the tailgate release switch and the seat heater switch (if fitted - some cars without heated seats still have the wiring and the plug is attached to the back of the console).
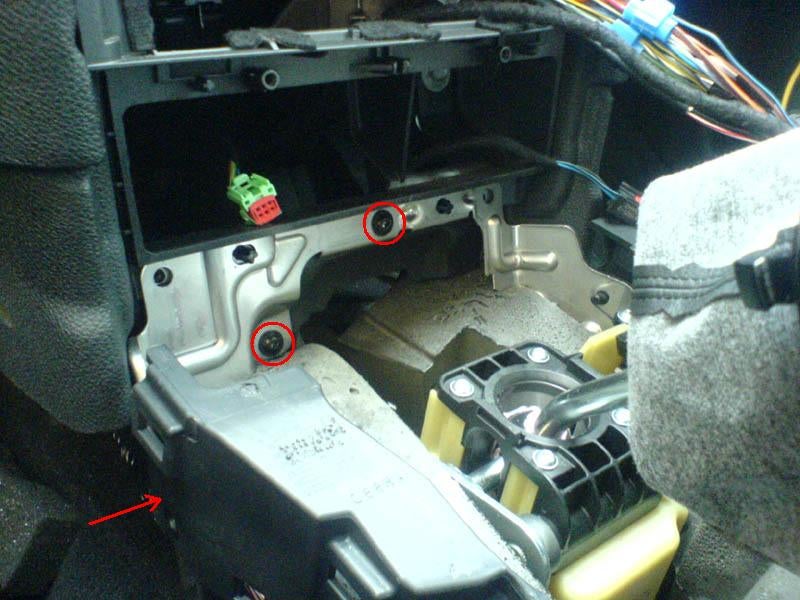
8. Now remove the metal bracket that most of the trim parts previously removed were screwed to. Unscrew the wo red screws and manoevre the bracket away, negotiating the lugs noted byt the red arrow.

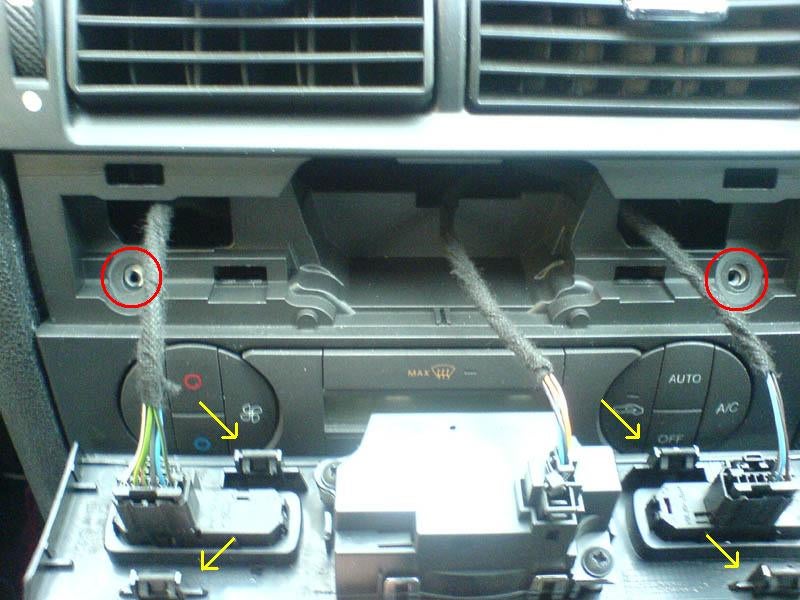
9. Moving up the dashboard, you now need to remove the trim surrounding the clock. This is levered off with a screwdriver being careful not to bend the trim. I actually wrapped the screwdriver with some soft material to do this, however the Ford manual apparently advises to remove the glovebox and push it out from behind. Please note the location of the clips below. Lever off at these points and remove the screws underneath.
10. The only screws left are on the inside of the radio area.
11. Now the console can be pulled forward, it is only held in by clips above the vents which need to be levered out with a screwdriver.
Previous Instructions
Unscrew the footwell screws, one each side and pull of trim. Then unscrew the screws that secure the console to the instrument panel bracket, 1 each side. These are just behind the 2 panels you have removed, by the front of the gear shift end of the console.
Remove the screws that secure the gear shift bezel to the console, 2 each side iirc. Pop out the cupholder and boot release switch and remove the 2 screws, then pull off the gear shift bezel assembly rear end first (no need to remove the gaiter).
Pop out the ashtray/cupholder and check if there's a screw underneath, if so, unscrew it.
Remove the 2 screws in the bottom of the rear stowage box (under the armrest).
The console should now be free to remove.


 Your Privacy Choices