Registrations
We now manually approve all new user accounts due to a large influx of spam bots. Accounts are normally approved within 48 hours.
If you need any help with using this Wiki, please ask here: TalkFord.com Wiki Submission Forum
Difference between revisions of "Window Winder Mechanism Replacement"
Compuwiz uk (Talk | contribs) |
Compuwiz uk (Talk | contribs) |
||
| Line 25: | Line 25: | ||
|data4 = '''Fairly Easy''' | |data4 = '''Fairly Easy''' | ||
|label5 = How long does this take? | |label5 = How long does this take? | ||
| − | |data5 = '''30 Mins ish''' | + | |data5 = '''30-40 Mins ish''' |
}} | }} | ||
| − | + | == Tools Required == | |
| − | + | Philips head screwdriver | |
| − | + | Flat head screwdriver | |
10mm ( i think ) spanner/socket | 10mm ( i think ) spanner/socket | ||
T25 Torx Bit | T25 Torx Bit | ||
| Line 37: | Line 37: | ||
Sharp Cutting Knife | Sharp Cutting Knife | ||
Silicon Sealant ( possible ) | Silicon Sealant ( possible ) | ||
| + | |||
| + | Optional Extras | ||
Extra Person or Sticky tape | Extra Person or Sticky tape | ||
| − | + | == Removal Process == | |
| − | + | ||
| − | + | ||
| − | + | ||
| − | + | ||
| − | + | ||
| − | + | ||
| − | + | ||
| − | + | ||
| − | + | ||
| − | + | ||
| − | + | ||
| − | + | ||
| − | + | ||
| − | + | ||
| − | + | ||
| − | + | ||
| − | + | ||
| − | + | ||
| − | + | ||
| − | + | ||
| − | + | ||
| − | + | ||
| − | + | ||
| − | + | ||
| − | + | ||
| − | + | ||
| − | + | ||
| − | + | ||
| − | + | ||
| − | + | ||
| − | + | ||
| − | + | ||
| − | + | ||
| − | + | ||
| − | + | ||
| − | + | ||
| − | + | ||
| − | + | ||
| − | + | ||
| − | + | ||
| − | + | ||
| − | + | [[Removal Of Door Cards - Mk3|Remove door card]] | |
| − | + | Unclip the electric window switch wiring from the door panel / speaker connection plate. | |
| − | + | [[File:door_winder_1.jpg]] | |
| − | + | Now undo the screws in the speaker connection plate & the door handle support/fixing bracket. ( 2 screws in the bracket & 7 in the speaker unit ) | |
| + | *the speaker can stay in place on the connection plate. | ||
| − | + | [[File:door_winder_2.jpg]] | |
| − | + | You should be left by something looking like this ( piccy below ). | |
| − | + | [[File:door_winder_3.jpg]] | |
| − | + | Now with care remove the top & 2 sides of the foam weather seal from the door ( a sharp knife used on the sealant usually does the trick but some heat may also help, the choice on how to do this is up to you ). | |
| + | *Leave as much of the bottom edge as possible connected to the door as that way you may get away without having to re-seal the weather seal as the factory stuff can sometimes be sticky enough to re-use a couple of time before silicon sealant or similar is required. | ||
| − | + | [[File:door_winder_4.jpg]] | |
| − | + | Once you have the weather seal peeled down suitably ( see piccy above ) then you can get on with undoing whats required to remove the mechanism :- | |
| − | |||
| − | + | Undo the winder motor from the unit ( 3 torx bolts ) & move it out the way still attached to the wiring loom | |
| + | *( unless your swapping that too in which case remove it & then unplug it from the door loom ) | ||
| − | + | Push the window down about half way to allow access for the following step | |
| − | + | Undo the 2 nuts holding the window in place ( one found in each opening into the inner door panel ) until the window is able to be pulled free from the clamp, these nuts should not need fully undoing to remove the window. | |
| + | *( once the window is out your will either need a spare person to hold it up or use the sticky tape to secure the window to the upper section of the door frame to stop it dropping down ( the rubber seals may have enough resistance to hold the window on there own once its pushed all the way back up but its best to be safe etc ) | ||
| − | + | Now undo the 5 torx screws highlighted in red in the piccy above | |
| + | *( again these don't need undoing fully unless you need them for the replacement unit ) | ||
| − | + | Now use a pair of pliers or similar & squeeze the white plastic clip ( shown in the piccy above highlighted in yellow ) through the door panel to undo the final fixing point for the mechanism | |
| − | + | Once that last clip is undone the whole winder mechanism should be loose & able to be pushed up a little so the screw heads clear the holes in the door panel and you can then move the mechanism about & extract it from the door through the large hole in the door panel ( highlighted in the above picture in Orange ) | |
| − | |||
| − | + | == Refitting Procedure == | |
| − | re-seal itself. | + | The refitting procedure is basically a reversal of the removal procedure, only real difference is you don't need the knife any more but may need some silicone sealant to re-seal the weather panel to the door if the factory sealant is not sticky enough to re-seal itself. |
[[Category:Mondeo_Mk3]] | [[Category:Mondeo_Mk3]] | ||
Revision as of 14:10, 15 March 2011
For more information, visit the Ford Mondeo forum on TalkFord.com, the definitive resource site covering all Fords from the present day to the 1970's.
|
Overview Guide | |
| Ford Model: | Mondeo |
|---|---|
| Petrol/Diesel: | All |
| Estimated Cost: | ???? |
| Difficulty? | Fairly Easy |
| How long does this take? | 30-40 Mins ish |
Tools Required
Philips head screwdriver Flat head screwdriver 10mm ( i think ) spanner/socket T25 Torx Bit T30 Torx Bit ( i think ) Sharp Cutting Knife Silicon Sealant ( possible )
Optional Extras
Extra Person or Sticky tape
Removal Process
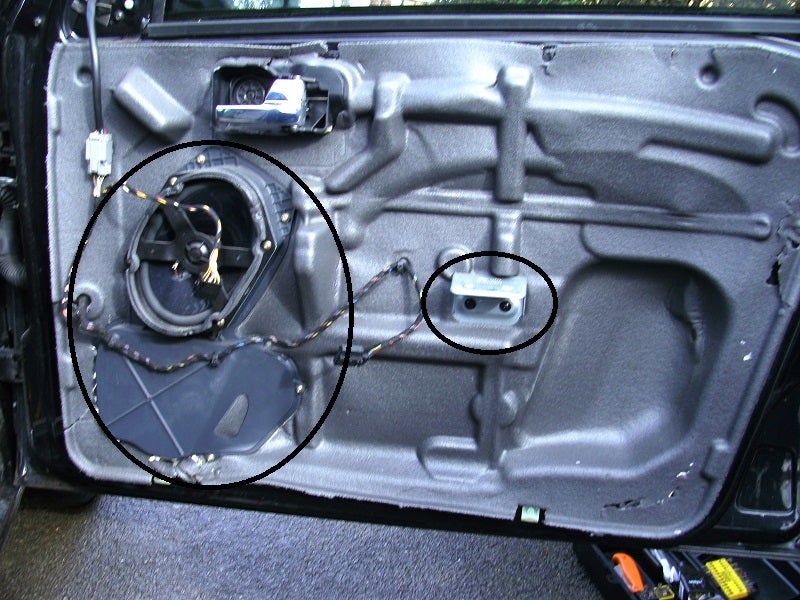
Unclip the electric window switch wiring from the door panel / speaker connection plate.
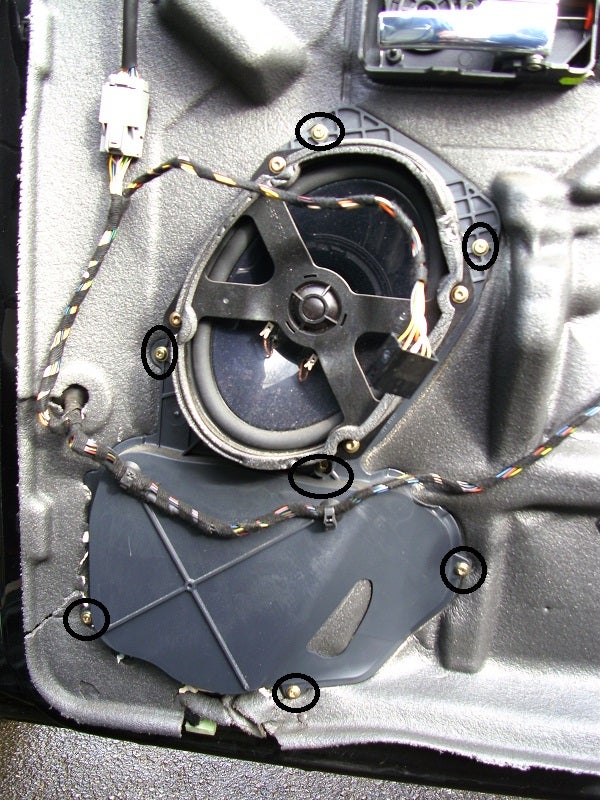
Now undo the screws in the speaker connection plate & the door handle support/fixing bracket. ( 2 screws in the bracket & 7 in the speaker unit )
- the speaker can stay in place on the connection plate.
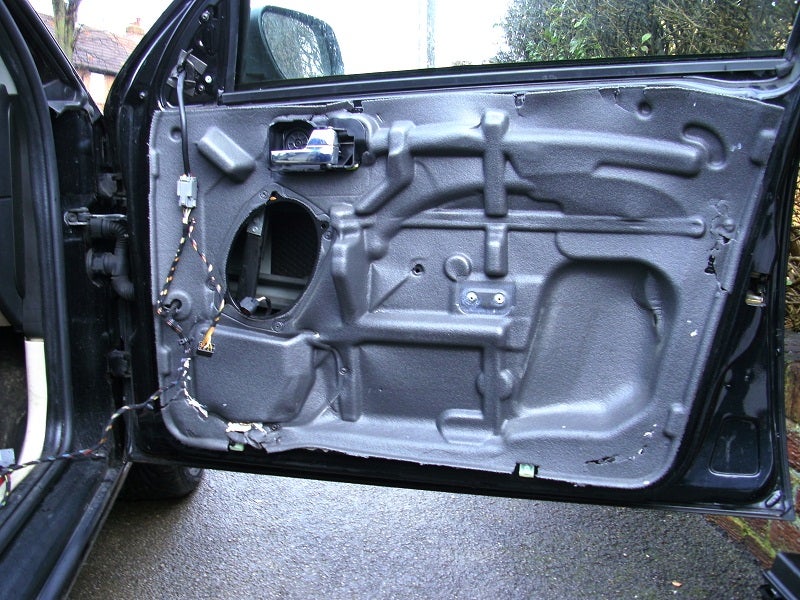
You should be left by something looking like this ( piccy below ).
Now with care remove the top & 2 sides of the foam weather seal from the door ( a sharp knife used on the sealant usually does the trick but some heat may also help, the choice on how to do this is up to you ).
- Leave as much of the bottom edge as possible connected to the door as that way you may get away without having to re-seal the weather seal as the factory stuff can sometimes be sticky enough to re-use a couple of time before silicon sealant or similar is required.
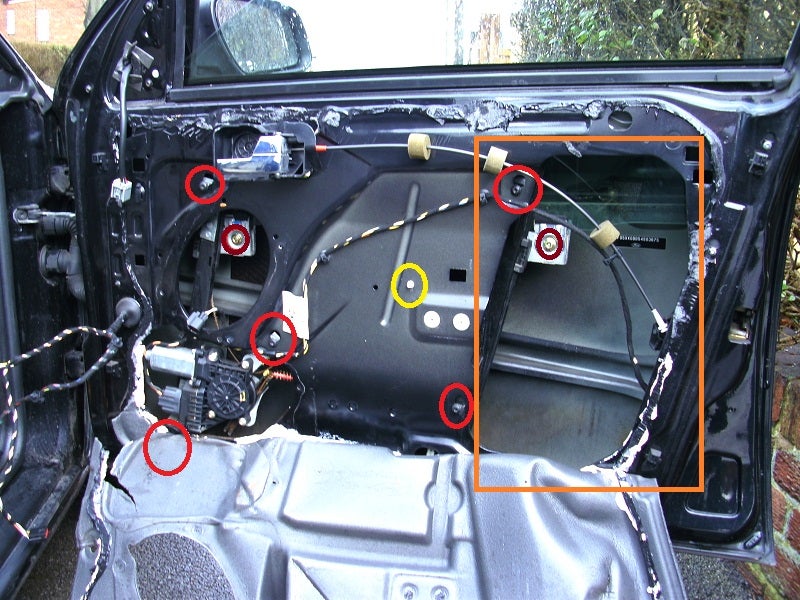
Once you have the weather seal peeled down suitably ( see piccy above ) then you can get on with undoing whats required to remove the mechanism :-
Undo the winder motor from the unit ( 3 torx bolts ) & move it out the way still attached to the wiring loom
- ( unless your swapping that too in which case remove it & then unplug it from the door loom )
Push the window down about half way to allow access for the following step
Undo the 2 nuts holding the window in place ( one found in each opening into the inner door panel ) until the window is able to be pulled free from the clamp, these nuts should not need fully undoing to remove the window.
- ( once the window is out your will either need a spare person to hold it up or use the sticky tape to secure the window to the upper section of the door frame to stop it dropping down ( the rubber seals may have enough resistance to hold the window on there own once its pushed all the way back up but its best to be safe etc )
Now undo the 5 torx screws highlighted in red in the piccy above
- ( again these don't need undoing fully unless you need them for the replacement unit )
Now use a pair of pliers or similar & squeeze the white plastic clip ( shown in the piccy above highlighted in yellow ) through the door panel to undo the final fixing point for the mechanism
Once that last clip is undone the whole winder mechanism should be loose & able to be pushed up a little so the screw heads clear the holes in the door panel and you can then move the mechanism about & extract it from the door through the large hole in the door panel ( highlighted in the above picture in Orange )
Refitting Procedure
The refitting procedure is basically a reversal of the removal procedure, only real difference is you don't need the knife any more but may need some silicone sealant to re-seal the weather panel to the door if the factory sealant is not sticky enough to re-seal itself.


 Your Privacy Choices