Registrations
We now manually approve all new user accounts due to a large influx of spam bots. Accounts are normally approved within 48 hours.
If you need any help with using this Wiki, please ask here: TalkFord.com Wiki Submission Forum
Auxiliary belt tensioner replacement
Gradual failure of the auxiliary belt tensioner on the Mk3 petrol is fairly common, causing a tinny rattle to the engine, particularly at idle. It also causes superfluous vibration of the belt, which must accelerate wear of the components it drives: the water pump, A/C compressor, alternator and power steering pump.
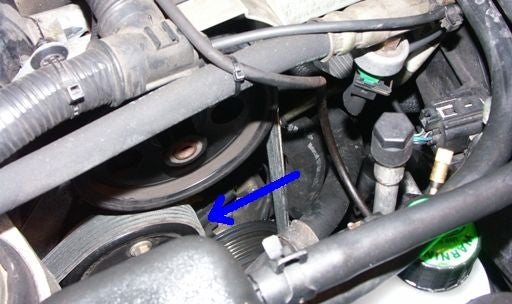
If you think your tensioner is on the way out, listen carefully with the bonnet open, the engine cover removed and the engine running at idle. The aux belt is on the left hand side as you stand at the front of the car looking at the engine. Obviously, keep clothing and hair out of the way of the running belt! The alternator can be seen at the back of this side at the top - the tensioner is at the bottom of the engine directly below it. The Haynes manual is sadly quiet on replacement, so here's a quick guide.
Replacement is fairly easy despite the location, but the part isn't cheap. You may also want to replace the belt at the same time - the normal service interval is 150k miles or 10 years, so if you're close to this, do it. You need to partially remove the belt anyway, so replacement is little extra work, just extra cost.
Parts needed
- New tensioner (FINIS 1371224, 1S7Q-6A228-A*)
- New belt if you choose to do this (FINIS 1120198, 1S7Q-6C301-A*)
Tools needed
- Wheelbrace & alloy wheel key if required
- Jack
- Axle stand (optional, but recommended)
- 8, 10 and 15mm sockets
Method
It's best to clean up as much as possible prior to starting work. Give the car a good wash, including the wheels and wheelarches.
Accessing the part
- Loosen the wheelnuts on the RH front roadwheel.
- Jack up the RH front of the car. Pay attention to the jacking points.
- Support the car on an axle stand at an appropriate point. You'll be pulling the car around - the standard jack isn't intended for this level of work.
- Remove the wheelnuts and the wheel.
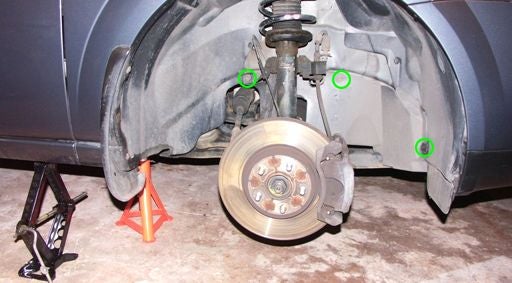
- Remove the one 8mm and two 10mm headed screws from the lower front plastic cover - circled in green below.


 Your Privacy Choices