Registrations
We now manually approve all new user accounts due to a large influx of spam bots. Accounts are normally approved within 48 hours.
If you need any help with using this Wiki, please ask here: TalkFord.com Wiki Submission Forum
Rear Shock Absorber Rattle - C-MAX
This applies to the Mk1 (Focus) C-MAX with normal rear suspension - not self-levelling.
If you are experiencing a rattle from the rear of the car on rough roads, this may be worth a check.
Diagnosis
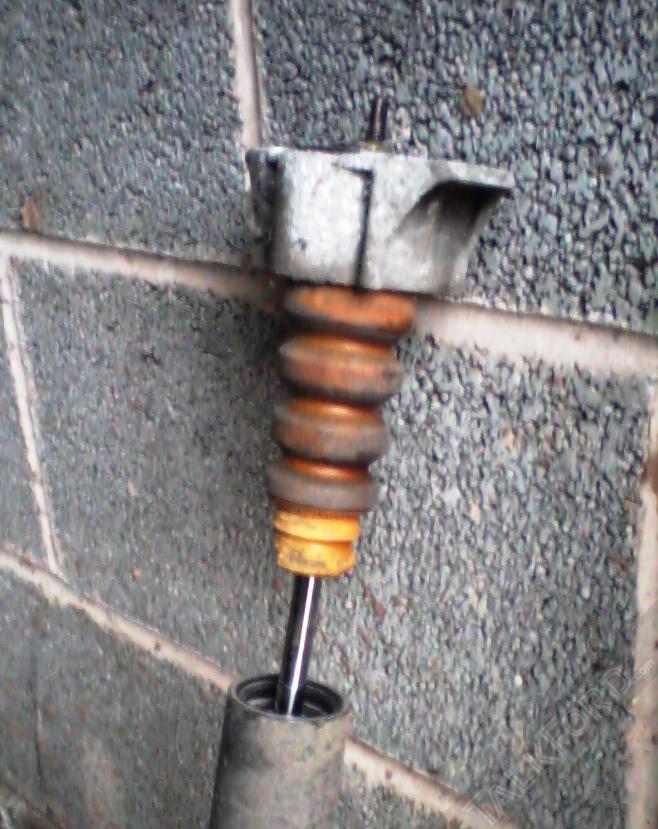
The rear suspension shock absorbers (strictly, "dampers", as they don't absorb shock) have a protective plastic tube fitted over the piston, attached to the rubber bump stops at the top. This tube can detach, exposing the piston; but it is then free to rattle up and down, producing a disproportionately loud rattle for its size.
If you have a rattle, it only takes a minute to check. Look in the rear wheelarch above the wheel and you should see the damper tube. If you can see the piston, or reach in and move the plastic tube up and down (don't force it - you'll tell if it's loose), that could well be the source of your rattle.
Here's a photo of the top of a damper that's failed in this way. The plastic tube at the bottom should be attached to the yellow rubber at the top:
Replacement
It's probably possible to re-glue the tube with suitably strong adhesive, but if it's failed in this way, it's likely that the dampers are fairly old anyway, and replacement would be worthwhile. If you choose to go this route, it's strongly recommended to replace both sides at once. A pair of new dampers from Ford will set you back somewhere around £140-150 at the time of writing.
It's a surprisingly easy job to replace them: if everything goes well, you're looking at around an hour to do both sides.
Tools required
- Trolley jack
- Axle stand
- Wheel brace or 19mm socket
- Locking wheel nut key (if applicable)
- Wheel chocks
- 10mm and 15mm sockets (check first, Ford often change fixings)
- Fairly long socket extension bar - at least 6" / 15cm
- Hefty long socket handle: I used my...
- Torque wrench, capable of setting to 25Nm and 115Nm
- Thread locking compound or new bolts with threadlock pre-applied
Method
Ideally, jack the car up and remove the wheel the day before the job, and clean up and spray WD-40 or other penetrating fluid on to the thread of the lower damper mounting bolt.
- Park the car on a flat surface with the handbrake on in 1st or reverse gear (or Park).
- Choose a side to work on first.
- Chock the diagonally-opposite front wheel.
- Loosen the rear wheel nuts slightly.
- Release the handbrake (for EPB, ignition on and depress brake, then leave ignition on throughout).
- Jack the car up at the rear sill in front of the rear wheel and place the axle stand in the recommended jacking position, about 10cm in front of the wheelarch. You'll need to position the jack further forward than this point, but keep it as far back as possible to avoid stressing the sill.
- Once the axle stand is secure, remove the jack.
- Remove the wheel nuts and take the wheel off.
- Place the trolley jack under the hub carrier and jack up the suspension a couple of inches to remove the "hanging" tension from the system.
- Undo and remove the lower damper mounting 15mm bolt. This is torqued to 115Nm and has threadlock on it, so you'll need to apply some force to this, and you won't have a lot of space to do so. Please ensure your car is securely supporting before applying any force. A belt-and-braces approach is good here: I used a piece of railway sleeper next to the axle stand in case anything went wrong.
- The damper is now held in by two 10mm bolts up inside the wheelarch. Undo and remove these (25Nm, this is where you need the extension) and the whole damper assembly should come out.
- Clean up the aggregated mud and other crap from inside the wheelarch - I used a scraper and a vacuum cleaner.
- Fitting the new damper is the reverse of removal. The new parts are not handed, and the tube is free to rotate to allow alignment. Make sure you have properly seated it at the top before tightening the bolts to 25Nm; and ensure the lower mount is properly clamped by the bolt at 115Nm.
- Tighten the wheel nuts to the correct torque.

 Your Privacy Choices