Registrations
We now manually approve all new user accounts due to a large influx of spam bots. Accounts are normally approved within 48 hours.
If you need any help with using this Wiki, please ask here: TalkFord.com Wiki Submission Forum
Immobiliser Dry Joint
For more information, visit the Ford Mondeo forum on TalkFord.com, the definitive resource site covering all Fords from the present day to the 1970's.
|
Overview Guide | |
| Ford Model: | Mondeo |
|---|---|
| Petrol/Diesel: | ??? |
| Estimated Cost: | ??? |
| Difficulty? | ??? |
| How long does this take? | ??? |
Immobiliser Dry Joint
Background
Being the owner of an early 95 reg 2 ltr Mondeo, I was becoming increasingly frustrated at an intermittent starting problem with the car which grew progressively worse over the space of last year. On pressing the key fob to de-activate the immobiliser, all the dashboard lights would illuminate as if nothing was wrong but a turn of the key produced no reaction from the engine whatsoever. Naturally it would only happen at a petrol station when their was a queue of people behind me or when I was in a hurry. Sometimes it would start first time and sometimes I'd be left sitting there clicking away like a mad man for ages. It was driving me insane. I'd checked all the usual things and was getting close to selling the car due to my frustration and inability to track down the cause. Salvation came when it was suggested that this was down to poorly soldered joints in the immobiliser. Apparently this is a very common problem with earlier Mondeos and on investigation ultimately proved to be a much easier (and almost costless) fix that I'd anticipated and well within the ability of the half decent home mechanic.
Method
Basically you need to remove the centre console of the car to get access to the immobiliser unit. This is held in place by a number of screws which can be accessed by prising off the little plastic caps that cover them. You will need to take off the panels in the footwells just forward of the centre console too. The gear lever gaiter can be unclipped from the console and left in place by feeding it through the resulting hole. This saves a lot of hassle. Also pull up the handbrake as high as you can as this will help when it comes to sliding off its respective gaiter.
The immobiliser is a black plastic box about five inches square mounted on the floor under the central console just in front of the gear stick. It's fixed underneath a silver metal bracket which is in turn rivetted to a couple of floor mounted brackets. You need to drill out the rivets to release it but after that everything else is a screwdriver job. There is a bundle of black wires that feed into one end of it but these can be unplugged very easily. I found I could unplug it for inspection without losing any engine or radio codes but obviously don't attempt to start the car or lock the doors while it's out. I didn't even need to undo the car battery. To open the unit you merely need to undo four small screws.
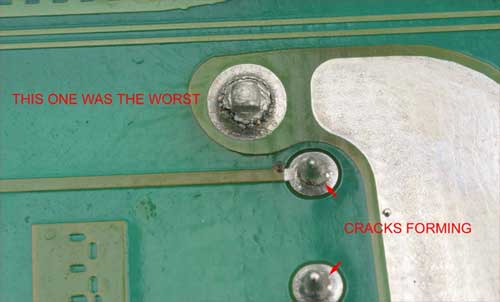
The rear of the circuit board is revealed and at first glance it looks very high tech. My initial reaction was that it looked OK but on much closer inspection with a good magnifying glass it became apparent that most of the larger soldered joints had circular cracks forming or had completely cracked. These circular cracks occur around the pins of some of the larger components on the circuit board and seem to be caused by some sort of unforeseen electro chemical reaction with age. This is the cause of the dreaded "dry joint" syndrome.
The solution is simply to resolder all the faulty joints. I used a high wattage pistol grip soldering iron so I could make the joints quickly with the minimum of heat sink through the board into the components. I added a little fresh solder to the bit each time and the cracked joints re-melted into nice bright shiny silver joints as good as new. I used just a touch of flux (the type plumbers use in the yellow tubs) on the worst joints applied very sparingly with a cocktail stick. It's important to remove all traces of this flux afterwards as it can corrode the joint later as it's not strictly designed for circuit boards but it does make for a perfect job. I wiped it off using cigarette lighter fluid. All of the smallest joints looked fine but I went over as many of the larger ones as I could just to be sure.
And that's it! Just put it all back together. I used two small nuts and bolts in place of the rivets to reassemble it but otherwise I could probably do the whole job in under two hours and easily less that four. The car has started perfectly every time since.
If you think you might be suffering from the same thing and your car fails to start, try thumping the drivers footwell just below the radio. If that helps then you've probably got this dry joint problem. Many thanks to all those who pointed me in the right direction in solving this annoyance.


 Your Privacy Choices