Registrations
We now manually approve all new user accounts due to a large influx of spam bots. Accounts are normally approved within 48 hours.
If you need any help with using this Wiki, please ask here: TalkFord.com Wiki Submission Forum
Speaker Installation - Rear Doors
For more information, visit the Ford Mondeo forum on TalkFord.com, the definitive resource site covering all Fords from the present day to the 1970's.
|
Overview Guide | |
| Ford Model: | Mondeo |
|---|---|
| Petrol/Diesel: | ??? |
| Estimated Cost: | ??? |
| Difficulty? | ??? |
| How long does this take? | ??? |
Contents
Speaker Installation - Rear Doors
Method
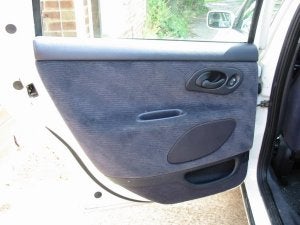
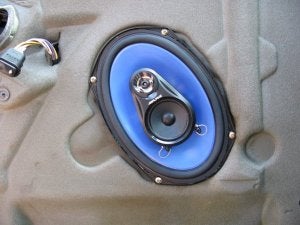
A reference point – how the door looks before installation and, of course, how it should look after!
1. Remove the window winder by pulling the retaining clip from behind the round part of the winder - OR -
Ease the electric window switch out by placing a screwdriver under the edge the switch surround and levering towards you
2. Remove the screw cap inside door lever and then remove the screw underneath. Prise the door lever surround loose and remove
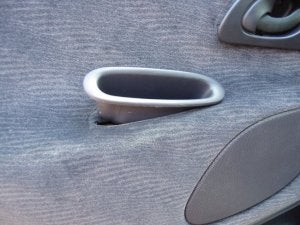
3. Remove the screw from inside of the pull handle on the door and then remove the pull handle
4. Remove the round screw plug on the lower front of the door, just below where plastic meets trim and then remove the screw revealed by removing the plug
5. Remove the remaining screws around the rim of the door and pull the lower half of the door panel slightly towards you and then lift up.
The two spring clips on the trim at the bottom of the window recess are stiff but should give if a little force is applied. Take care not to bend the panel whilst removing it
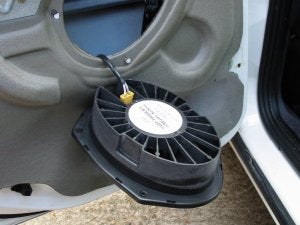
6. Remove the screws from the existing speaker and then remove the speaker
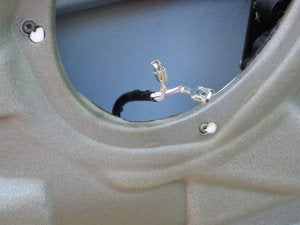
7. Cut or prise off the yellow surround to the door speaker wire connectors.
If prising the surrounds off then look for the tags that hold the cover in place on the connectors and work on these
8. Install the 6.5" inch adapter plate, if used, by placing over the existing mounting and screwing in. Depending on the quality of the adapter plate the holes may be slightly offset so put each screw in loosely, and then tighten when all screws are mounted
9. Fit the wiring speakers connectors onto the new speakers making sure than the cables are fitted the right way round. On the Mark 2, the grey/white cable is positive, but this may vary by age of car. Some tweaking with pliers may be required to get the negative connector to fix onto the terminal on the speaker if it is narrow, so briefing experiment to get the best fit before clamping it up hard
10. Fix the speaker into the door loosely and test the speaker. If it works correctly then screw the speaker into door. Note that 6x9 speakers will require some cutting of the door to install properly
11. Once installed, drop the window to make sure that the speaker doesn’t interfere with the movement of the window. If it does, you may be able to pad the speaker out by fitting a spacer between the door and the speaker
12. Refit the door panel by dropping the top of the panel onto the bottom of window recess and then push down gently. The clips should snap as the trim slots back in
13. Push the electric window switch loom, if fitted, through the cut-out in the door panel and connect the switch back onto the loom. Then push back the switch back into the cut-out in the panel. Re-insert the door pull handle, checking alignment as you do, and then re-fit the retaining screw
14. Re-fit the fixing screw at the lower front of the door Push the door lever surround back into place and screw in. Re-fit the screw cap
15. Re-fit the remaining screws around the rim of the door
16. Refit the window winder, if fitted
Front speaker fitment
Fitting front speakers following the same process as the rear speakers, but no cutting of the door should be needed to fit 6x9s. Additionally, you should note the following:
the interior mirror panel needs removing before * the door trim will lift off the screws securing the front door pull handle are hidden under a face plate and this will need removing (see picture below) to gain access to the screws. Again, experience suggests levering the plate off from the bottom, just in case you scuff the trim
fitting 6x9s is should be simply a case of offering the speaker up to the door and drilling four mounting holes to suit
Head unit fitment
Mark 2 Mondeos will require a blanking plate to fill the space left by the oversize head unit so that a standard DIN cage will fit.
Usually a loom adapter will be needed to plug your new head unit into the Ford loom - these are available for most common makes of head unit.
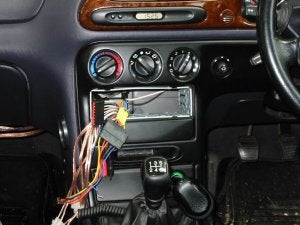
Note the wiring loom adapters (uppermost) with ISO connectors, RCA plugs (left of the gear knob) that lead to an extra amplifier and speaker wires in chocolate blocks (lower left of gear knob) yet to be connected to speaker loom to feed amplified output back into Ford speaker wires.
Speaker Cables: The Mondeo door connectors are multi-way plug so fitting new speaker wire to the doors will involve drilling holes in both door and pillars, or joining your new wires to the multi-way plug. Unless you are planning a sound-off car, it's probably not worth bothering going to this trouble as the Ford wiring does a reasonable job. It could be argued that road noise heard whilst driving will affect the sound quality far more than mediocre speaker cables!






 Your Privacy Choices